
This is a premium feature that may not be available on your current plan. Check availability on the Applivery pricing page.
Once set up, your organization members can log in to the Applivery Dashboard, App Store, or MDM Portal using their Microsoft 365 credentials — no separate Applivery password needed.
The flow goes in two directions: first, you export the Service Provider metadata from Applivery and import it into Entra ID, then you export the Identity Provider metadata from Entra ID and import it back into Applivery. Azure Security Group mapping — which has a unique quirk compared to other IdPs — is covered at the end.
If you plan to use a custom domain for your App Store or MDM Portal, configure it in Applivery before starting this guide. Custom domains change the callback URLs embedded in the SAML metadata, so the order matters.
Prerequisites
You'll need administrator access to your Applivery Workspace, and Global Administrator or Application Administrator access to the Microsoft Entra admin center. If you are using a custom domain, make sure it is configured first in Applivery under the Settings section, then navigate to Store Customization from the left-hand menu.
Setup
Once in the Applivery Dashboard, go to your Workspace Settings from the top dropdown menu, then open Login providers in the left-hand menu. Find the SAML row and click Configure for the portal you want to protect — Dashboard, App Store, or MDM Portal. Each portal is configured independently.
On the SAML configuration screen, you have two options depending on your Entra ID setup:
Click Download Metadata to get the SAML Metadata XML file. This is the fastest option — uploading it to Entra ID will fill in all required fields automatically.
If your Entra ID tenant doesn't support metadata upload, use the individual values shown on screen:
| Field | Description |
|---|---|
| Identifier (Entity ID) | The unique identifier for Applivery as a Service Provider. |
| Reply URL (ACS URL) | Where Entra ID will POST the SAML response after authentication. |
| Callback URL | The URL users land on after a successful login. |
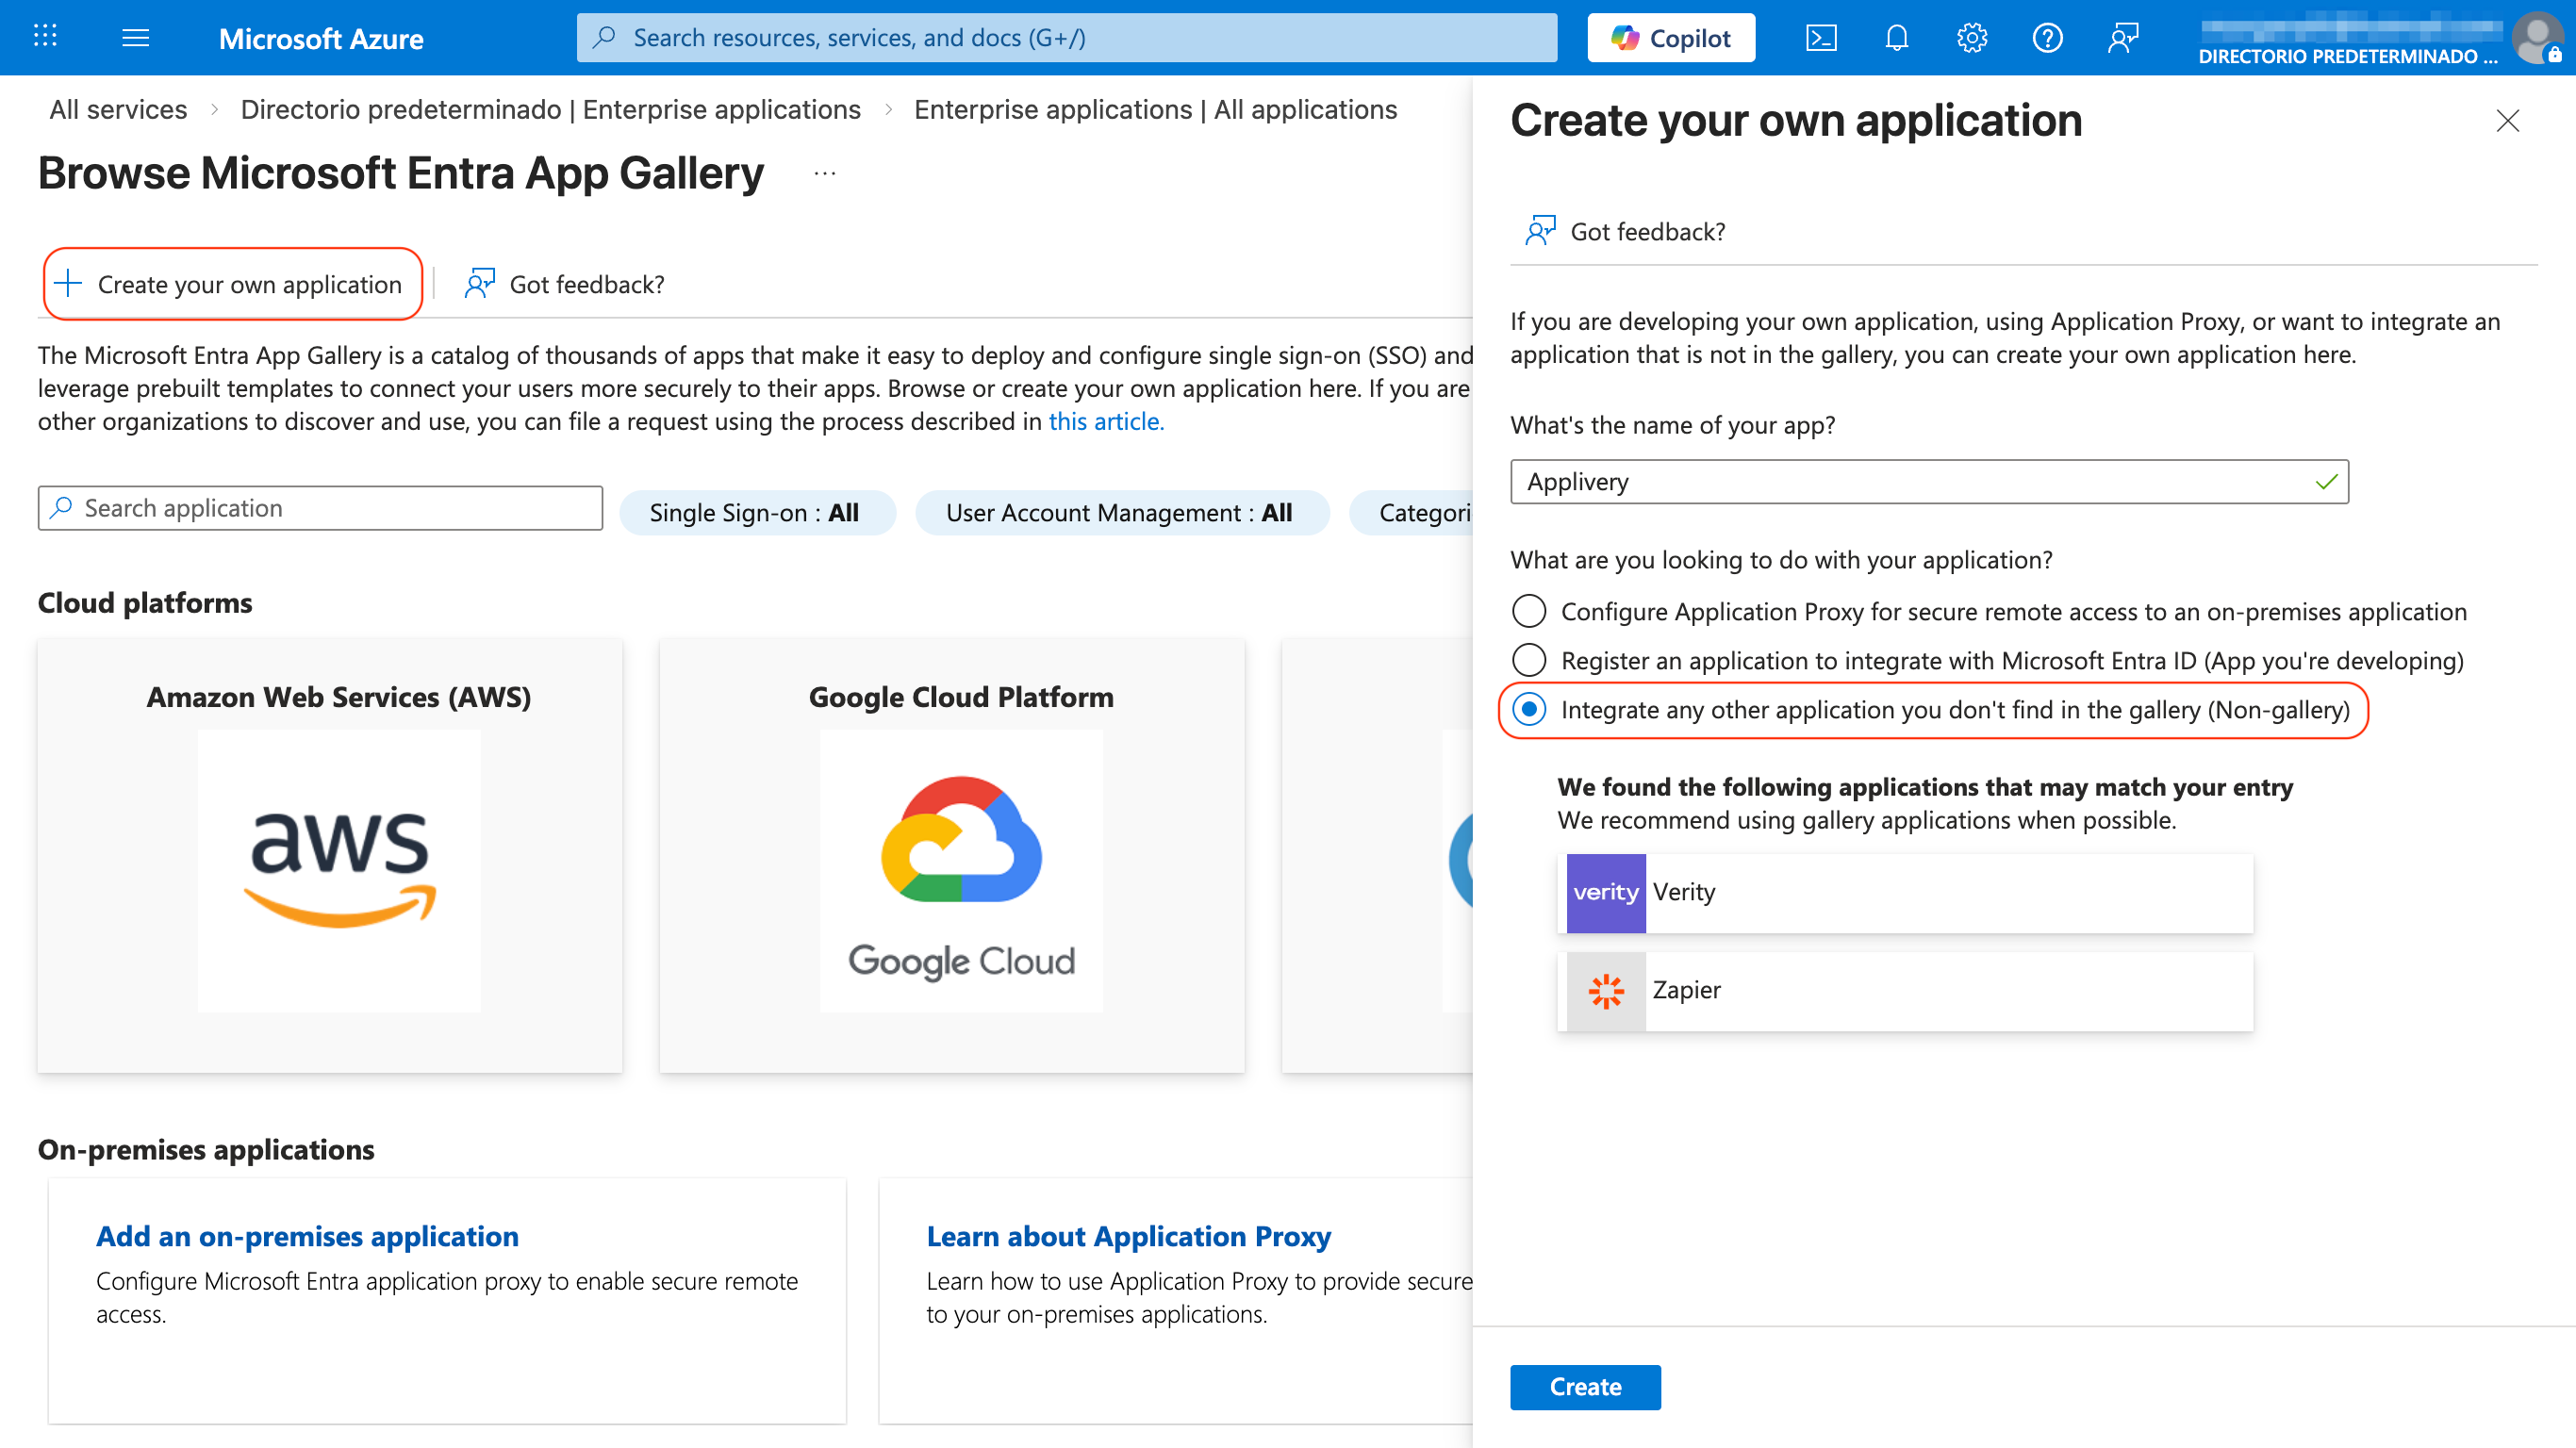
In the Azure Portal, go to Microsoft Entra ID → Enterprise applications and click + New application.
Select Create your own application, give it a name (e.g. Applivery), choose Integrate any other application you don't find in the gallery (Non-gallery), and click Create.
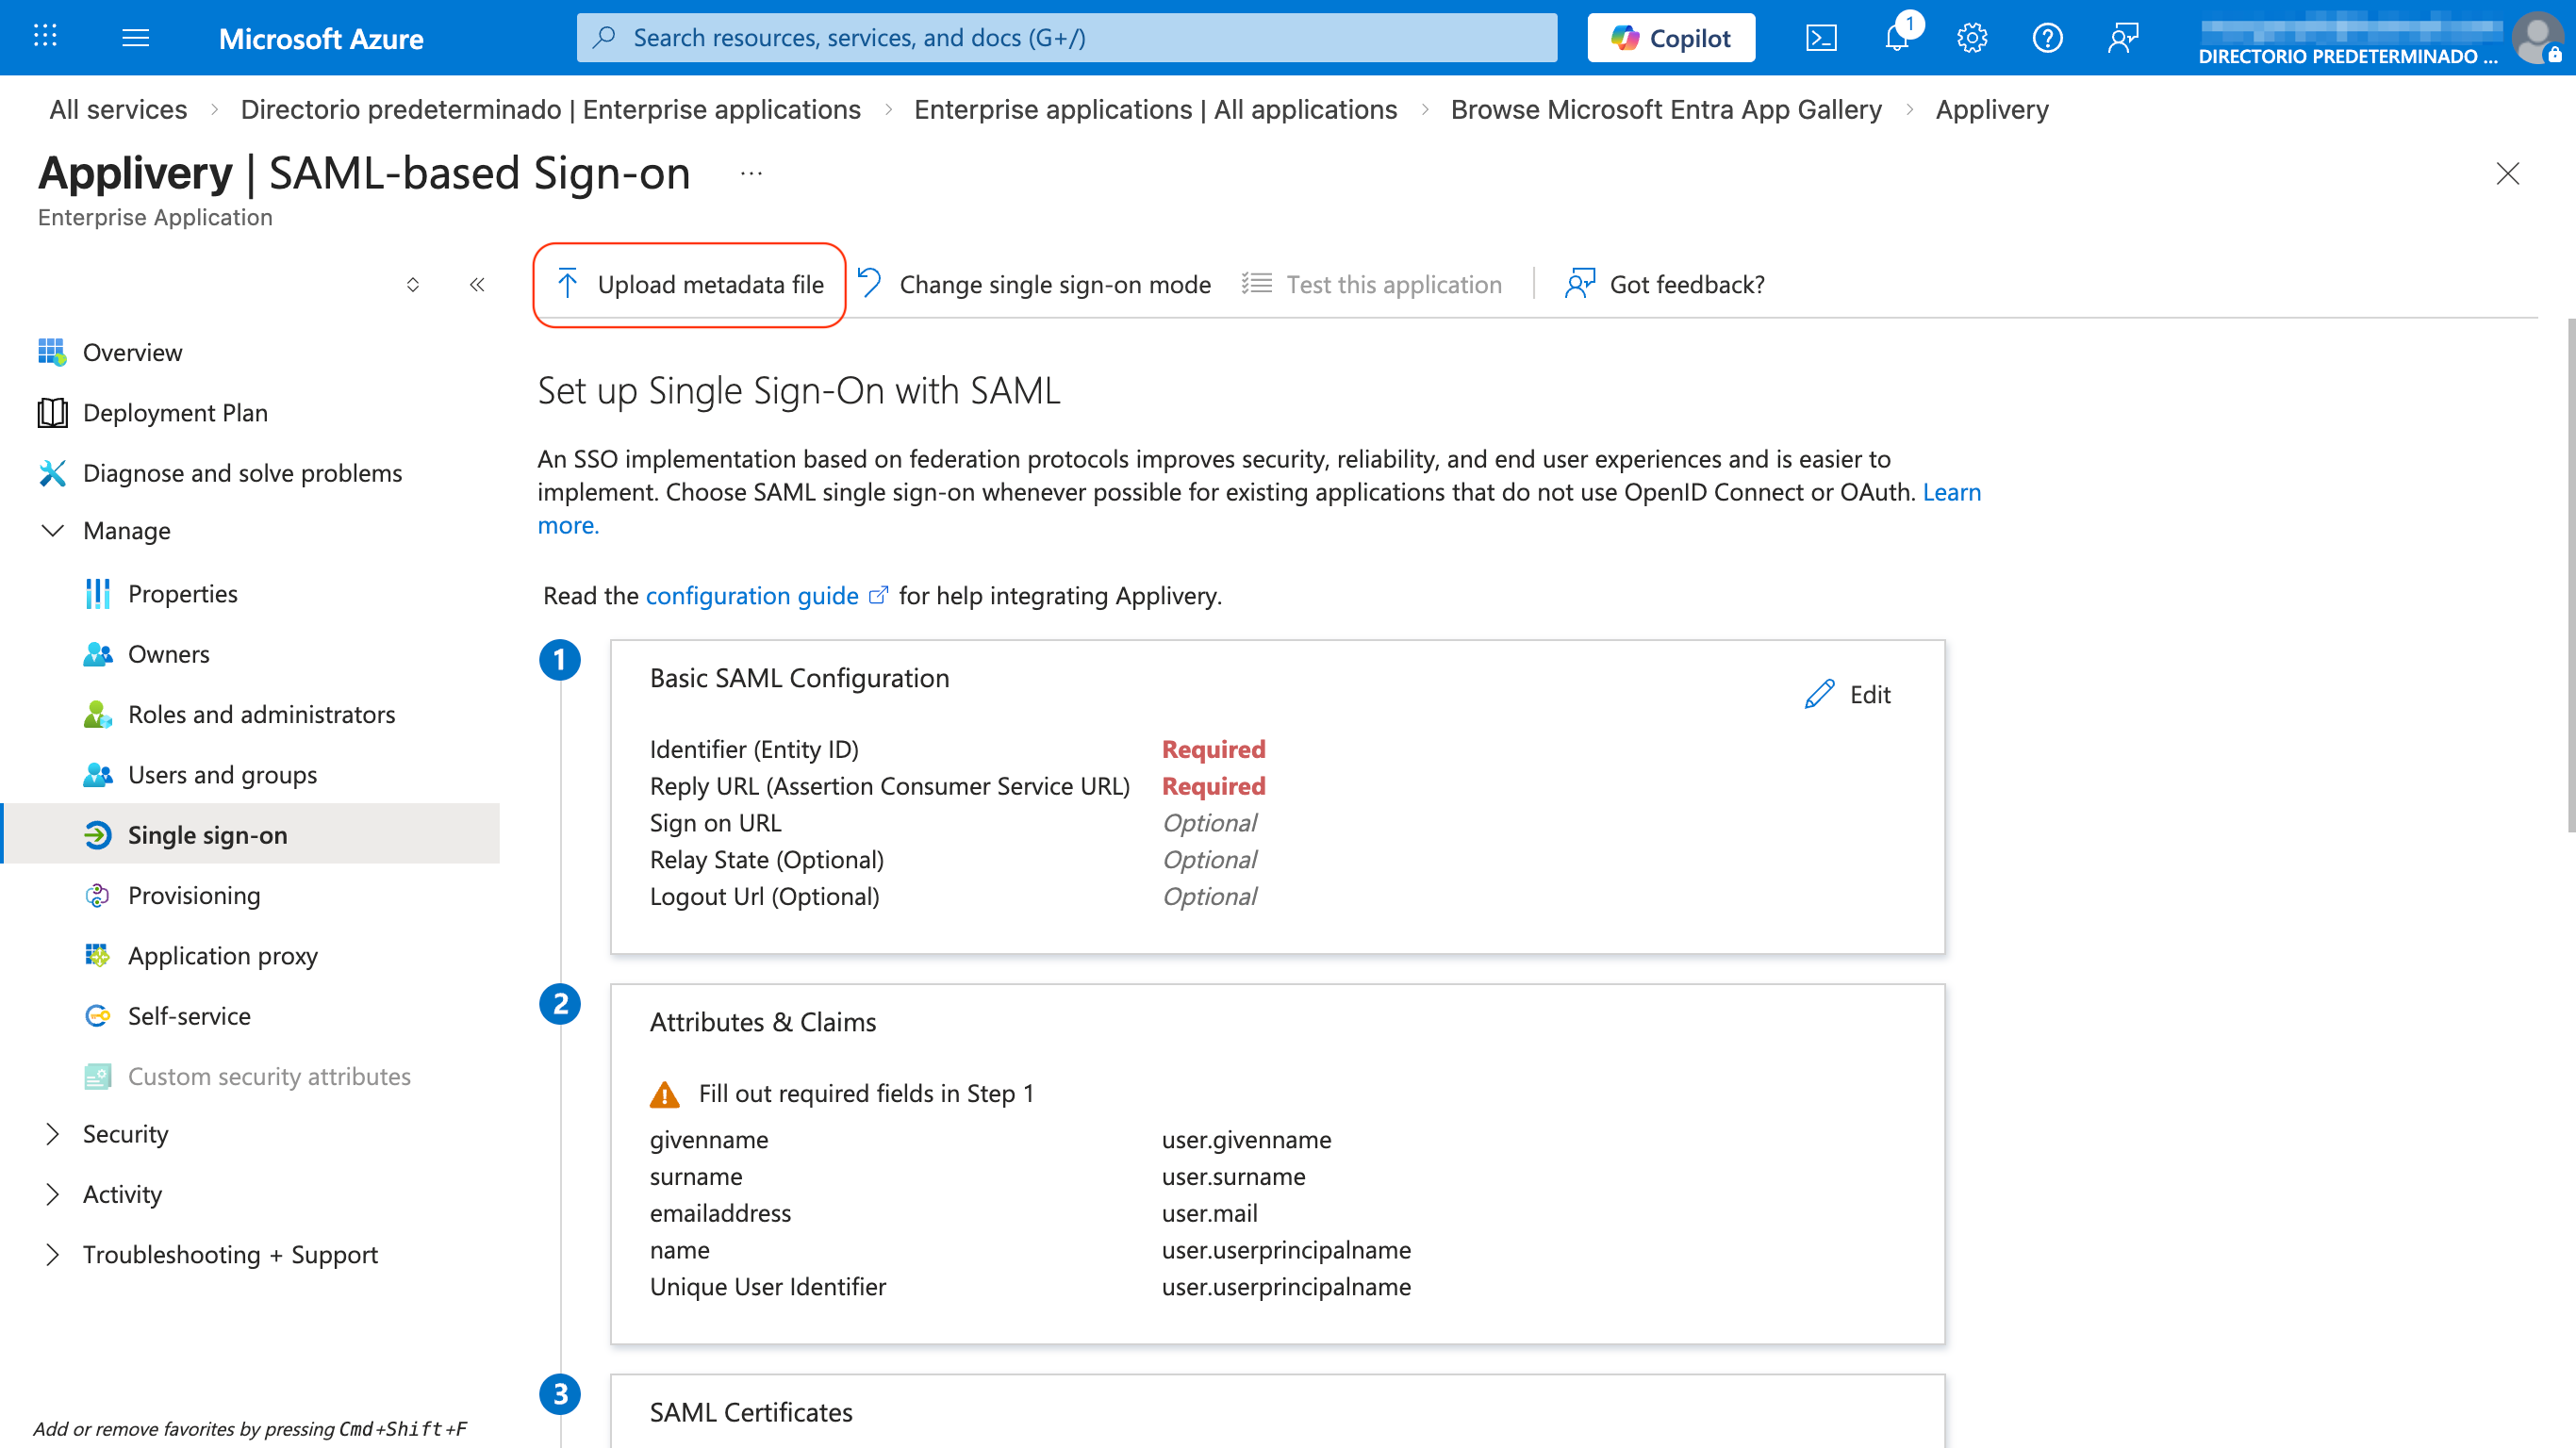
Inside the application, go to Setup Single Sign-On from the left menu and select SAML. At the top of the configuration page, click Upload metadata file and select the XML file you downloaded from Applivery — the required fields will populate automatically.
If you're configuring manually, fill in Section 1 – Basic SAML Configuration with the Identifier, Reply URL, and Sign on URL values from Applivery, then click Save.
Before anyone can log in via SSO, they need to be assigned to the application in Entra ID. Go to Users and groups in the left menu, click + Add user/group, select the users or groups who should have access to Applivery, and click Assign.
Go back to Single Sign-On in your application. In Section 3 – SAML Certificates, click the Download link next to Federation Metadata XML and save the file — you'll upload it to Applivery in the next step.

Go back to the Applivery SAML configuration screen for the same portal you started with in Step 1. Upload the Federation Metadata XML file from Entra ID, click Save changes, then use the toggle switch to enable the integration.
With everything saved and enabled, test with an assigned user. For the Dashboard, go to https://dashboard.applivery.io/welcome/sso, enter the user's email, and you'll be redirected to Microsoft for authentication. For the App Store or MDM Portal, just navigate to the portal URL — the SSO redirect will happen automatically.
Azure Security Group mapping
Unlike most Identity Providers, Azure Entra ID does not send group display names in SAML assertions — it sends Object IDs (GUIDs). This means that without additional configuration, the groups Applivery receive look like 89f3b2c1-4a7e-4d91-... rather than engineering or qa-team.
To make groups usable for Publication filters and role mapping, you need to do two things: enable group claims in Entra ID so the assertion includes them, and then map the Object IDs to friendly names in Applivery.
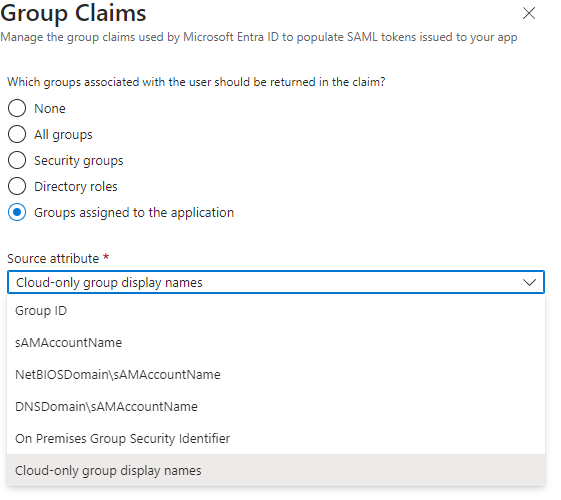
Enable group claims in Entra ID
In your Enterprise Application, go to Single Sign-On and edit the Attributes & Claims configuration. Then click the + Add a group claim button and select Security groups (or All groups if needed), set the Source attribute to Group ID, and make sure the claim schema is:
http://schemas.microsoft.com/ws/2008/06/identity/claims/groups
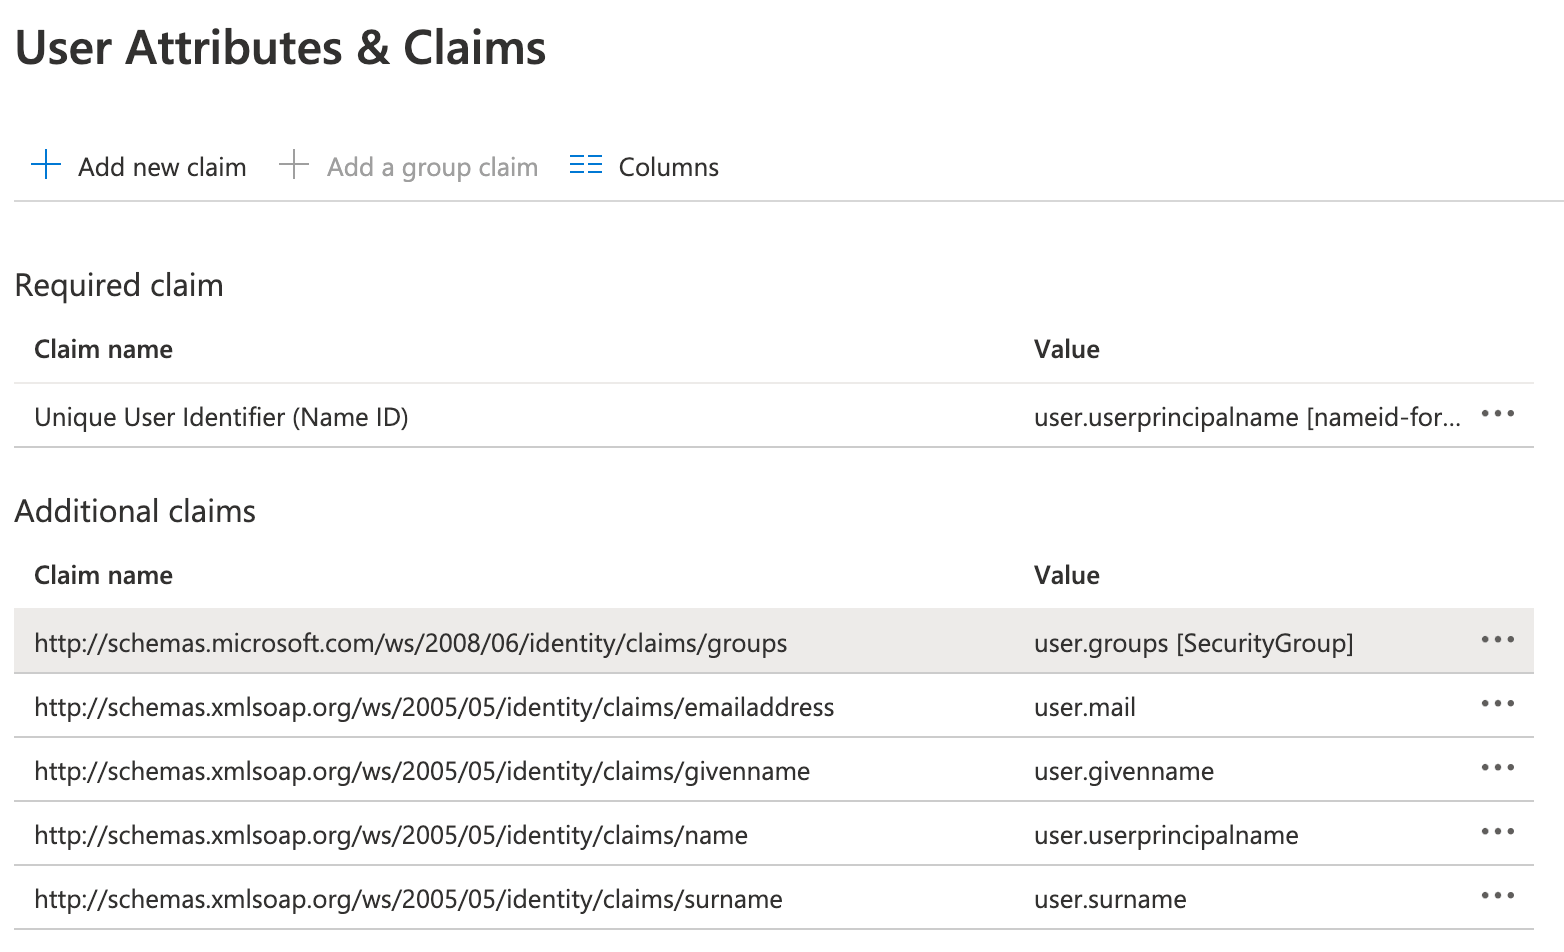
Save your changes. Entra ID will now include Security Group Object IDs in every SAML assertion.
Map Object IDs to group names in Applivery
In the Applivery Dashboard, go to your SAML configuration. For each Azure Security Group, add a mapping entry with the group's Object ID as the key and the desired Applivery group name as the value.
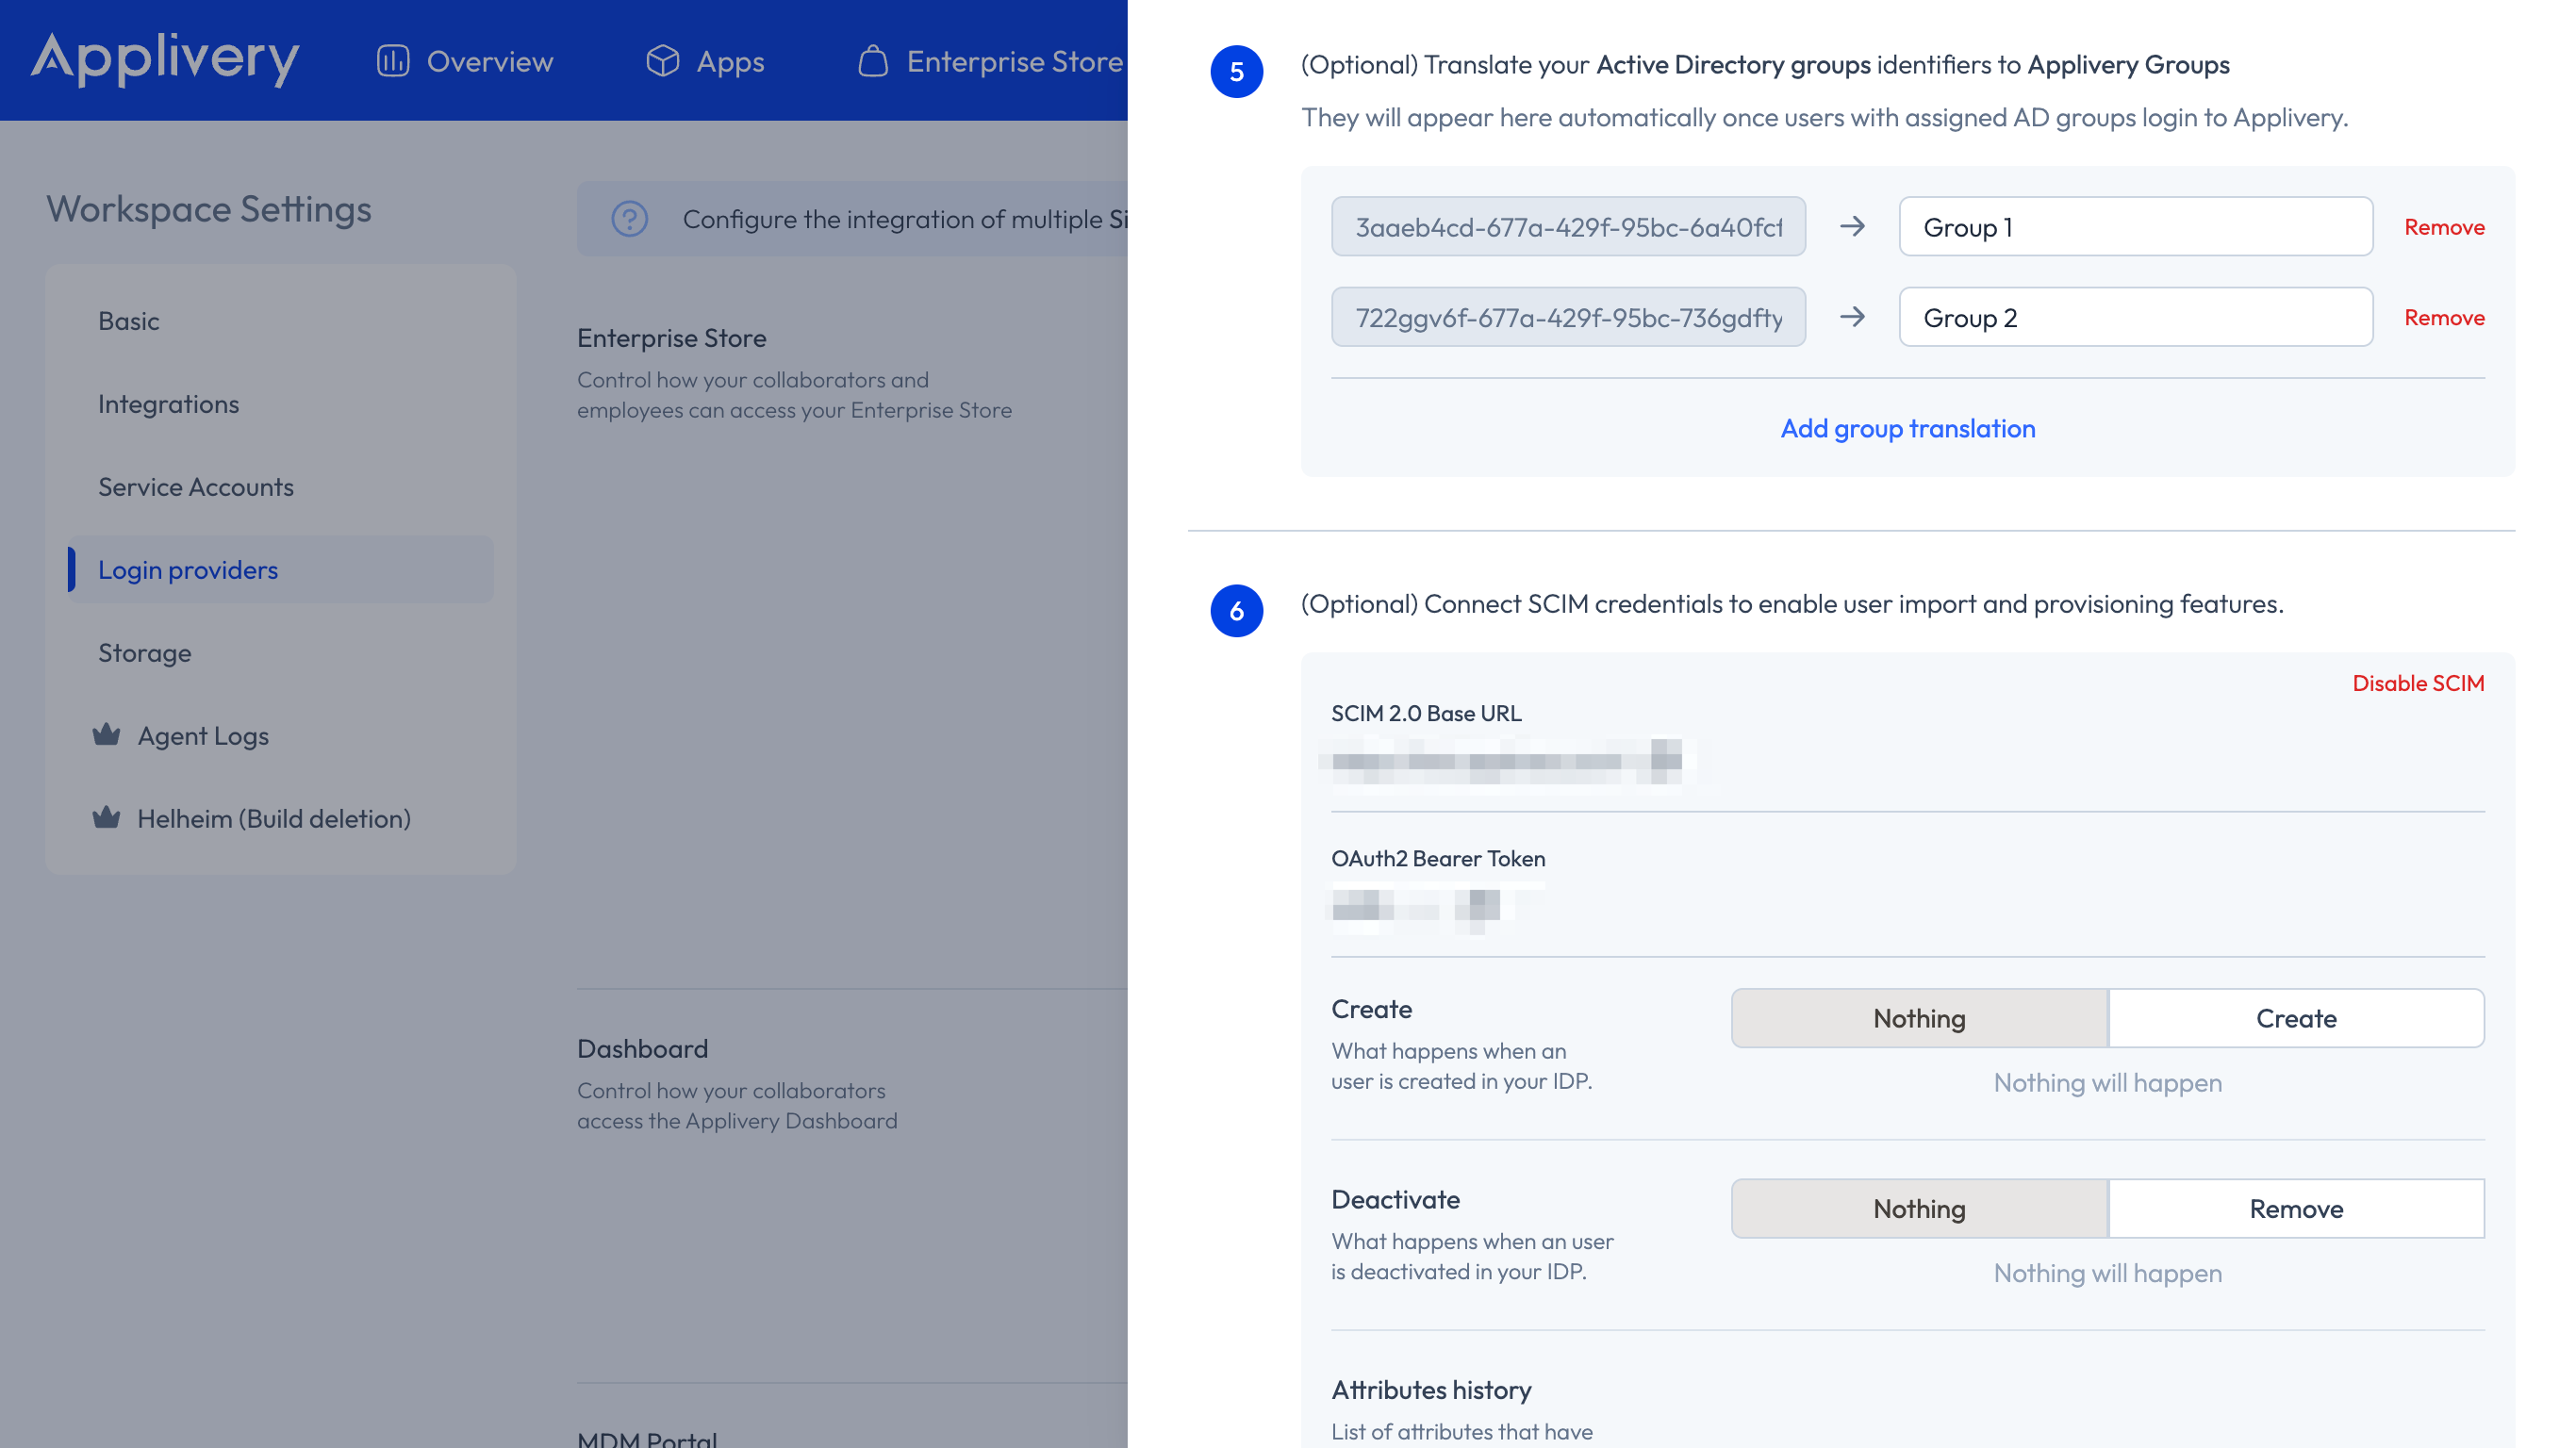
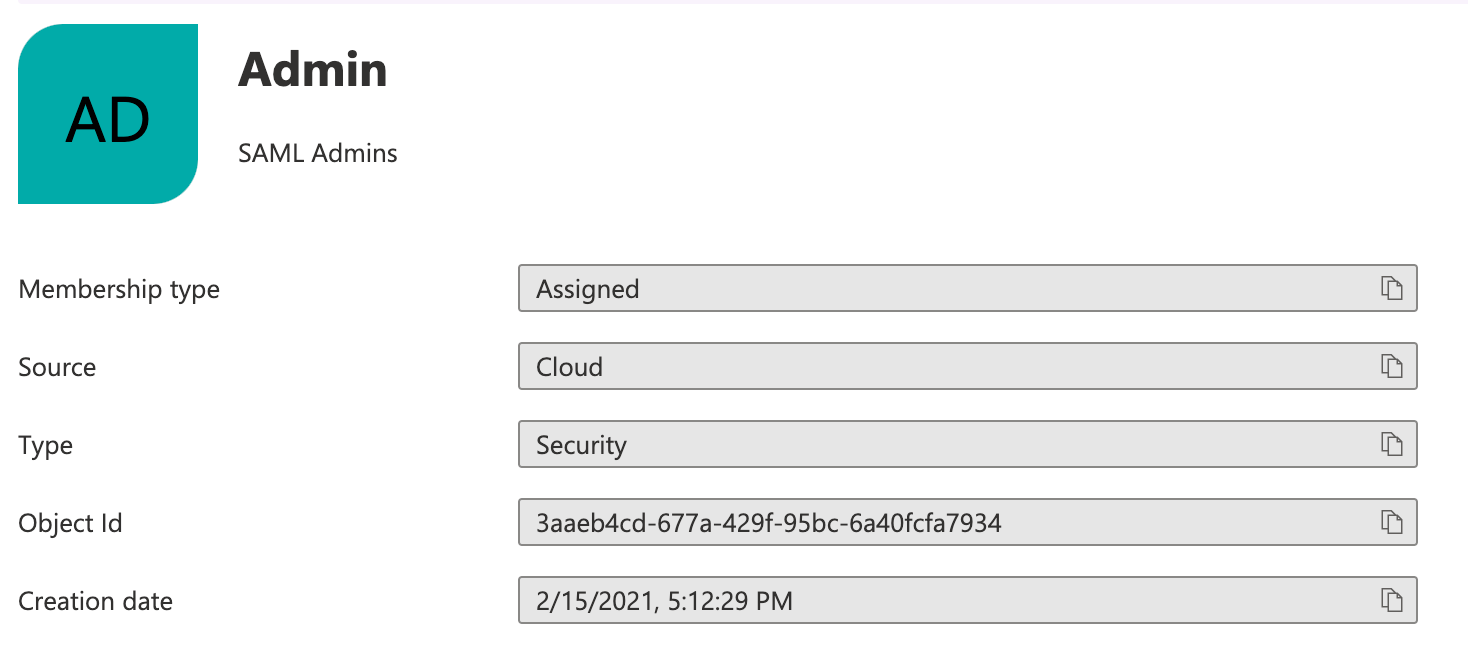
You can find Object IDs under Microsoft Entra ID → Groups — open each group and copy the Object ID field.
You don't need to pre-configure all groups before going live. Applivery automatically detects new Object IDs as users authenticate and adds them to the mapping list as placeholders. You can assign friendly names at any time after the integration is active.
Role mapping from Azure groups
If you're configuring the Dashboard portal and want Azure Security Groups to automatically assign Applivery Collaborator roles to new users, you need to send group display names instead of Object IDs — so Applivery can match them directly to the reserved role group names (applivery-admin, applivery-editor, etc.).
In the User Attributes & Claims section of your Entra ID application, edit the group's claim and set the Source attribute to Cloud-only group display names instead of Group ID. With this in place, Applivery can assign roles on first login without needing any Object ID → name mapping.
Role mapping only applies to App Distribution. Device Management permissions are governed exclusively by Segment permissions.