The Apple Agent is a software that can be installed on the devices of an organization. Its purpose is to empower Applivery to enhance its capabilities, extending beyond Apple’s MDM protocol and unlocking advanced management functionalities.
Before deploying the Applivery Agent, it is essential to understand the guidelines and requirements set forth by Apple to ensure compliance and optimal functionality.
Agent App for macOS devices
The use of macOS Agent provides additional functionality and advanced management capabilities that are not available through the use of Apple APIs. This allows a deeper customization and more complete management of macOS devices in an enterprise environment.
It provides a series of extra functionalities for both the user, who owns the device, and the IT administrator, who manages the corporate device fleet.
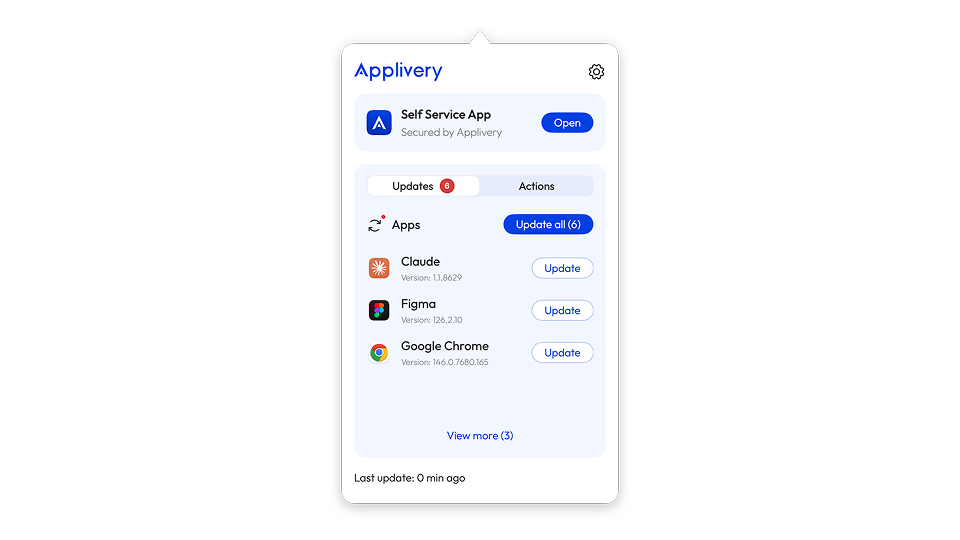
Self-Service for macOS stands as a native Swift application designed to provide the Apple experience your users expect. Its core functionality revolves around enhancing IT operational efficiency by equipping users with the necessary tools to independently address common requests, thereby offloading tasks from administrators. Through seamless integration into managed devices, Self-Service facilitates automatic deployment, establishing a dedicated platform for users. Within this environment, users gain access to a curated repository of resources, empowering them to efficiently fulfill their needs.

1.1 App Catalog
Admins can designate applications for end users to install on demand. For detailed guidance on managing applications and licenses, please refer to our documentation.
1.2 Actions
Grant your end-users the ability to execute scripts for task assistance or device issue resolution. The results of these executions will be automatically reported to the Applivery Dashboard.
You can find out how to assign a script to Self Service here.
1.3 Bookmarks
You can use bookmarks to provide your users with easy access to specified webpages directly. When you make a bookmark available in Self-Service, you can customize how the bookmark is displayed to users. This includes customizing the bookmarks label, uploading a custom icon, and adding a description.
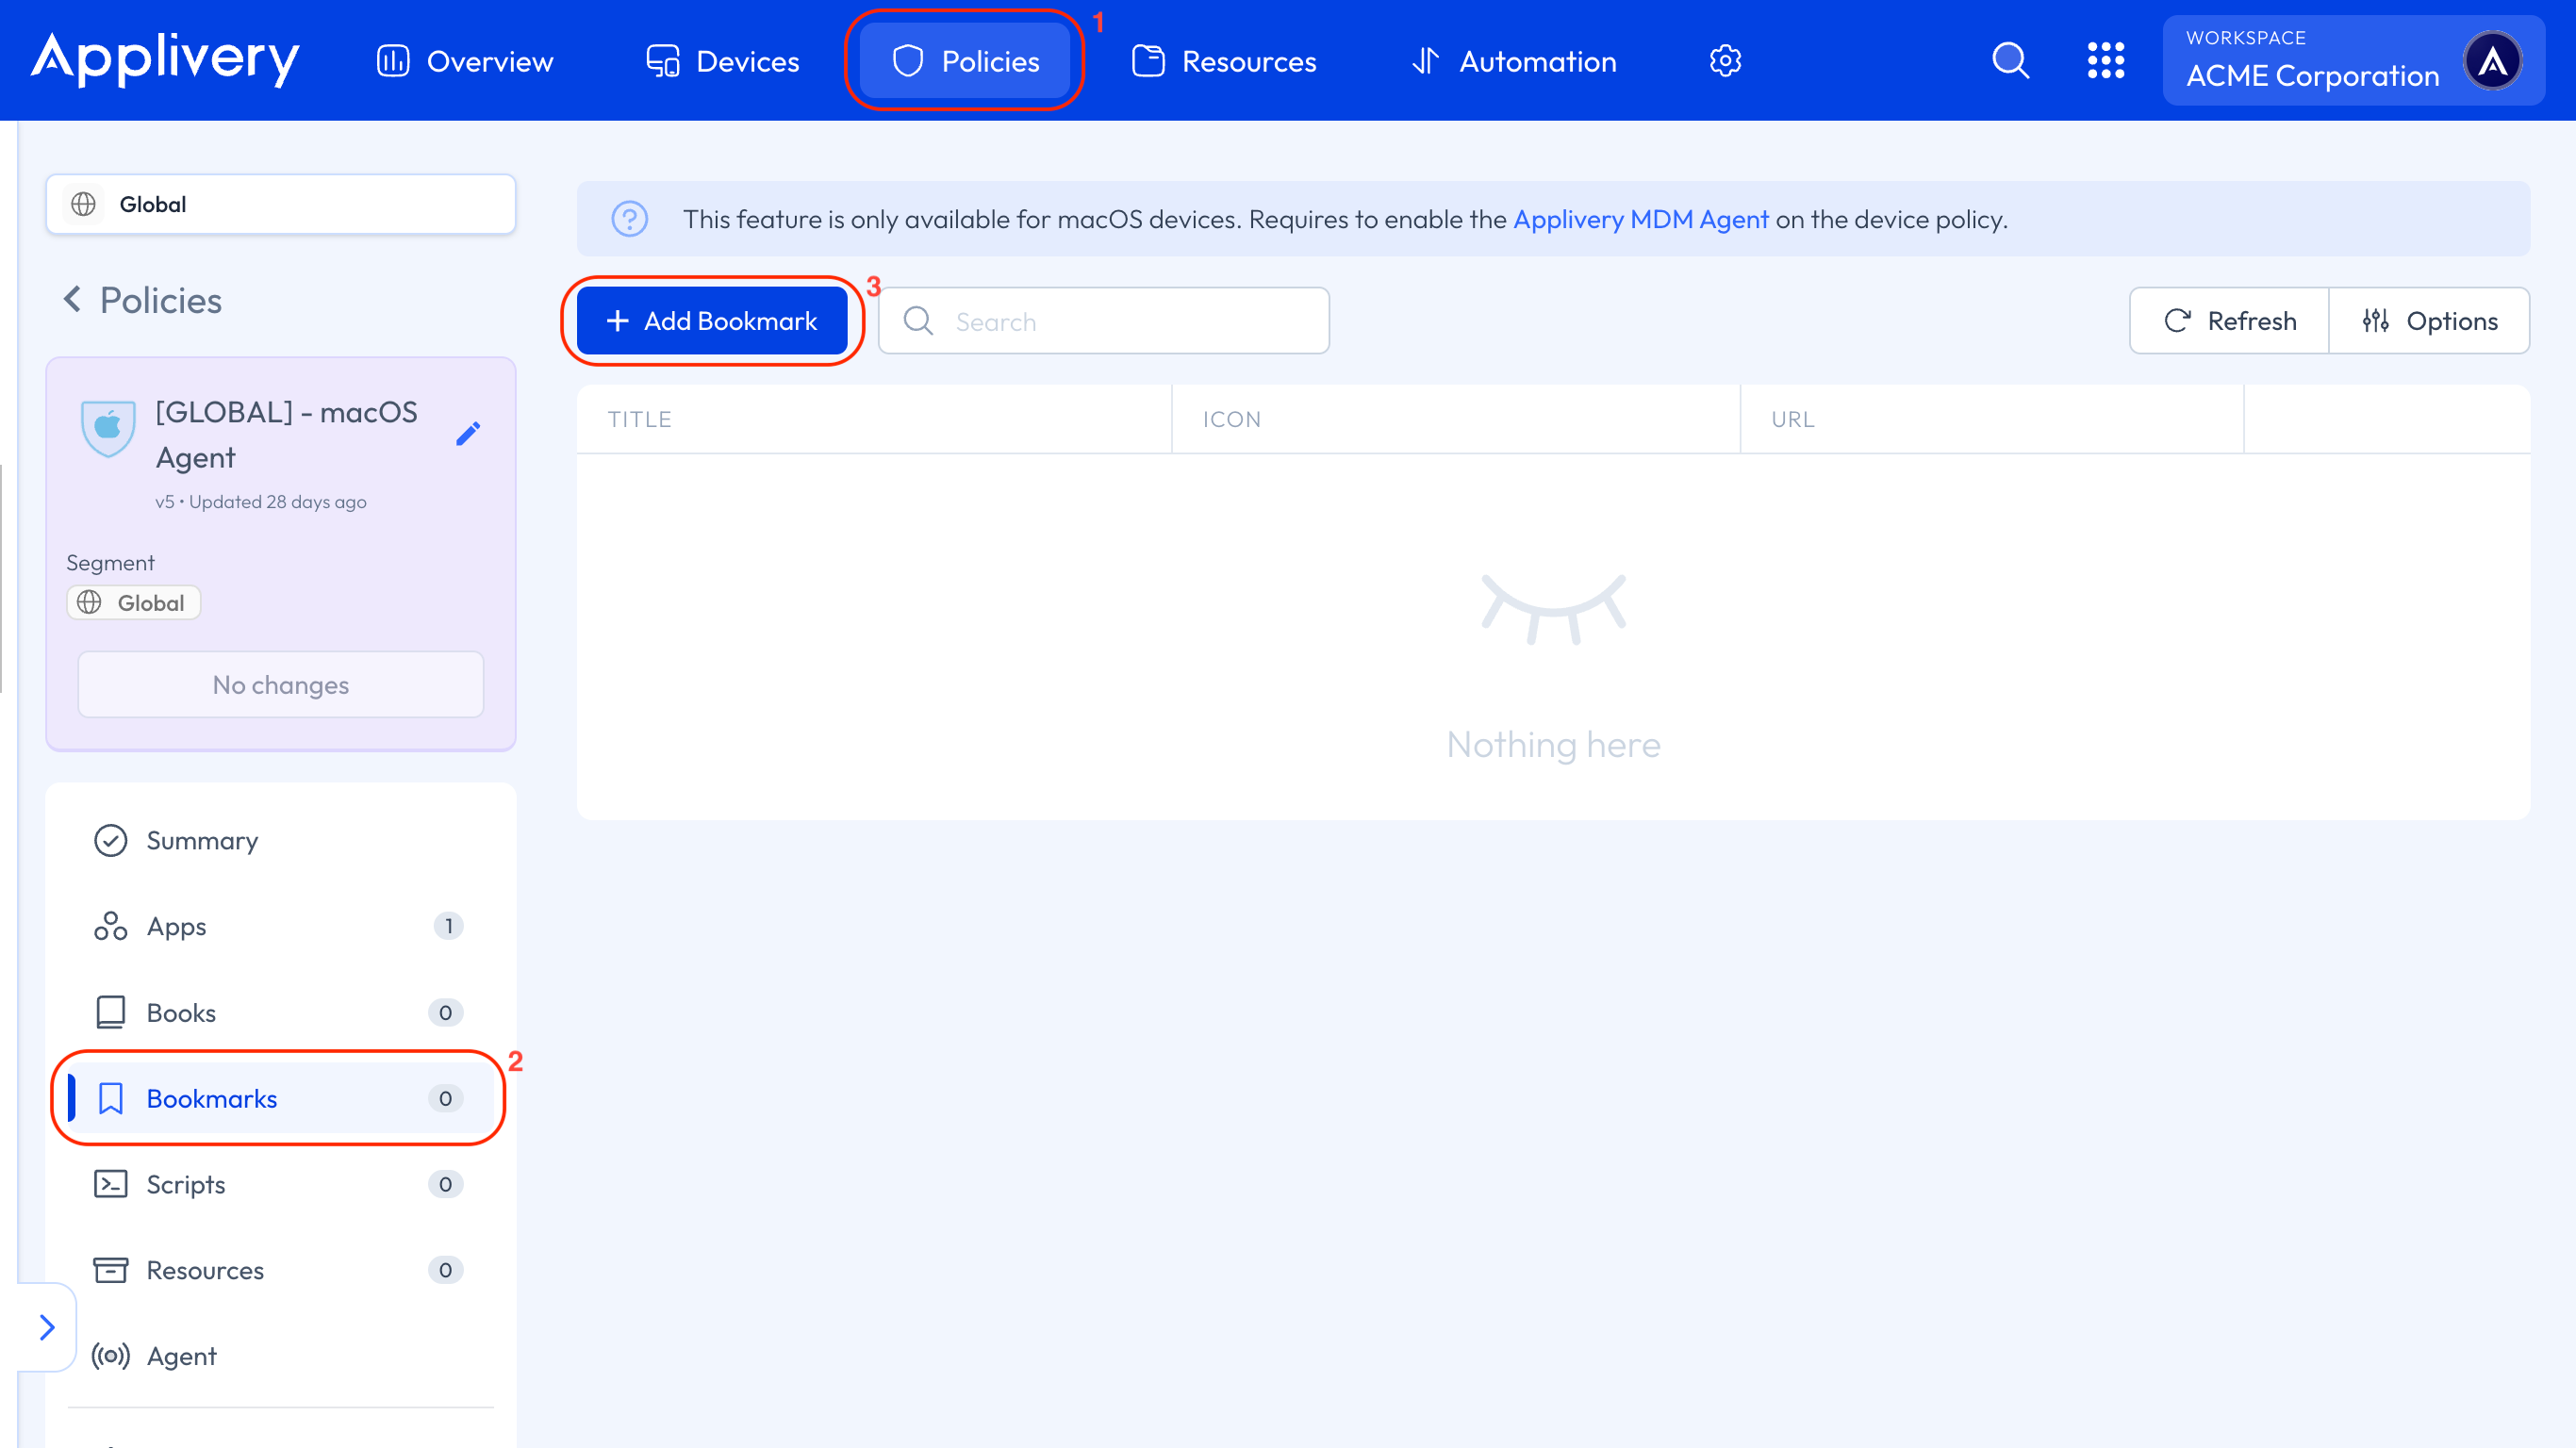
To configure bookmarks, navigate to any of your Policies (1) within the Applivery Dashboard. In the left-hand menu, click on Bookmarks (2), then click the + Add Bookmark button (3) to begin adding bookmarks to your Self Service.
1.4 Status reporting
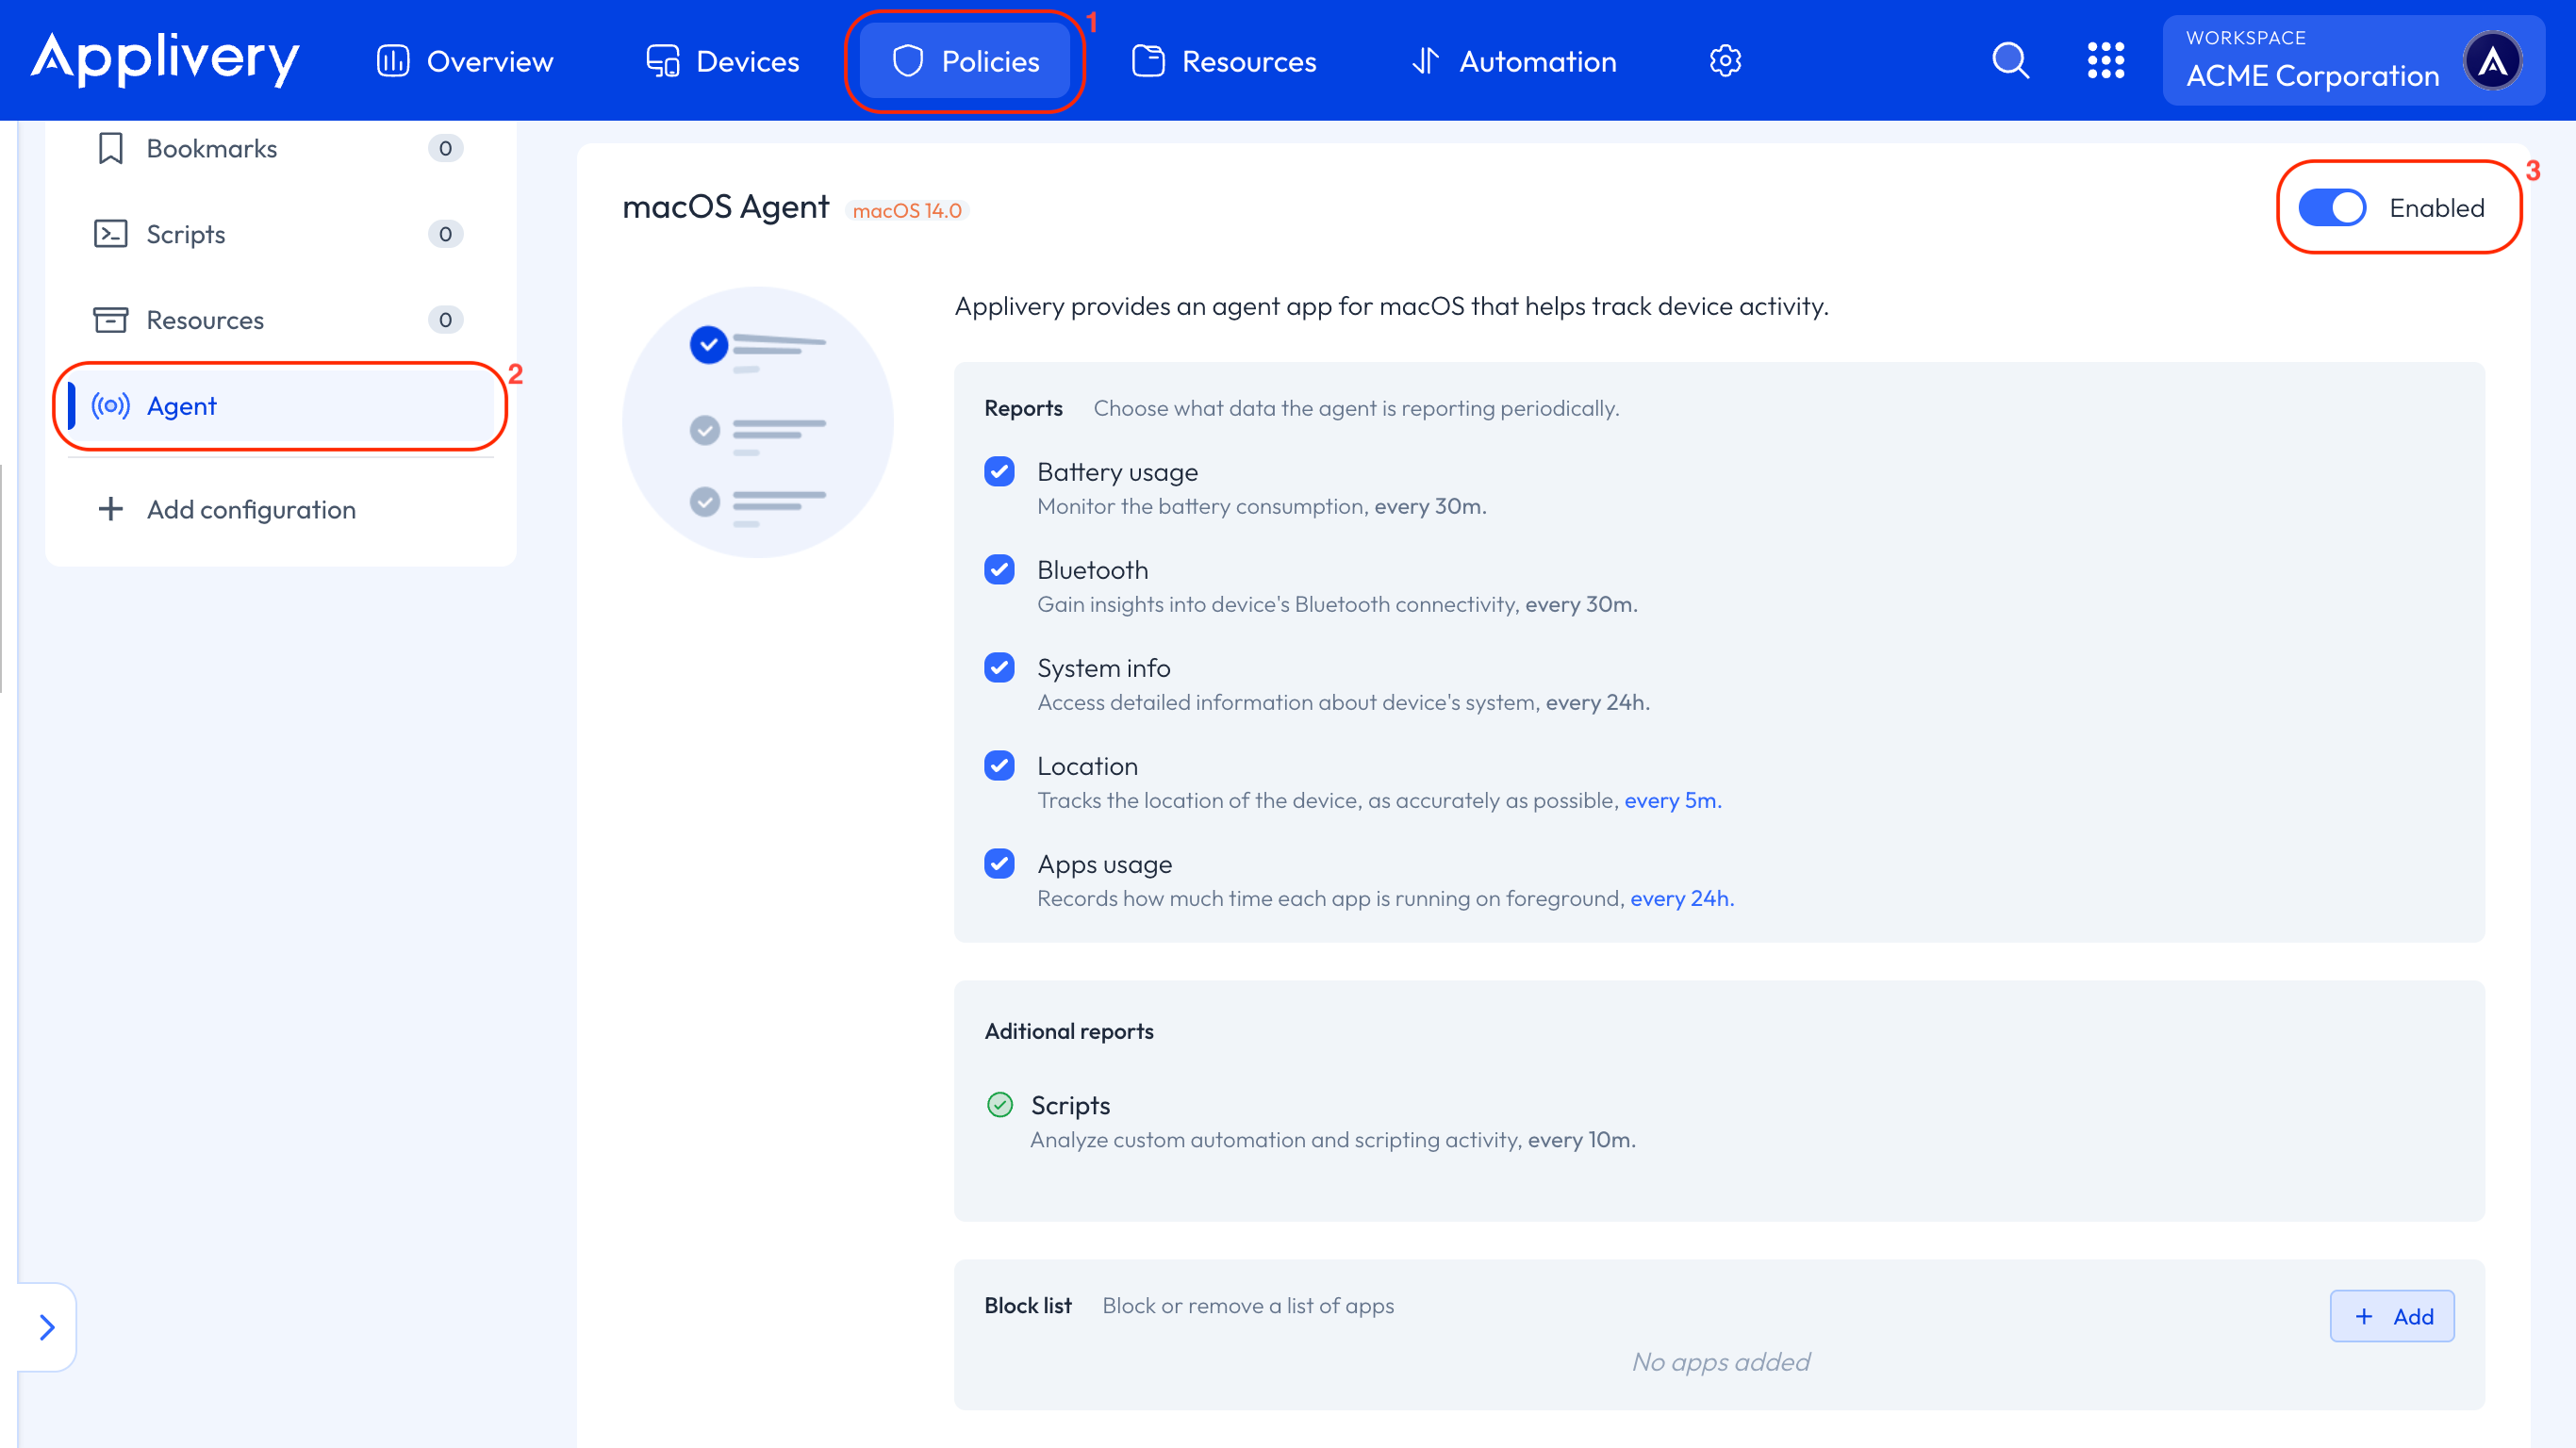
The Agent offers detailed reports on macOS device status and performance, enabling IT administrators to make informed management decisions. This optional reporting feature can be activated directly through the Agent, providing administrators with additional insights.
Track the reports sent to the Applivery Dashboard regarding battery status, Bluetooth activity, and system information.
Applivery macOS Agent App blocklisting feature offers the advantage of managing both user-installed Apps and pre-installed Apps on the device.
App blocklisting enables the selection of non-compliant Apps, ensuring their removal if installed or preventing their installation in the future.
Non-compliant Apps refer to those not distributed via Applivery, whereas corporate Apps distributed through the product are classified as managed Apps. In this context, IT administrators must prevent non-compliant Apps from accessing or sharing corporate data.
To configure an App blocklist, follow the steps described in the following article in our documentation.
Navigate to any of your Policies (1) within the Applivery Dashboard. In the left-hand menu, click on Agent (2) and enable (3) the macOS Agent.
Agent App for iOS devices
After setup, the user arrives at the Self-Service Portal — the main user-facing interface of the Agent.
Layout
The portal has three main elements:
Top bar: Shows the current section name. On the left, a menu icon opens the navigation drawer. Inside detail screens (such as an app detail page), the menu icon is replaced by a back arrow.
Content area: Displays the active section (Applications, Bookmarks, Status, etc.).
Navigation drawer — A side panel that slides in from the left. Lists all enabled sections and allows switching between them.
Which Sections Are Visible?
The sections shown in the navigation drawer depend on what the administrator has enabled via managed configuration. Only active sections appear in the menu. If no features are configured, the portal defaults to showing the Status section so the user always has visibility into the device's management health.
Applications
The Applications section is the core feature of the Self-Service Portal. It allows users to browse, install, update, and uninstall corporate applications assigned to their devices. The section is organized into three tabs.

Home Tab
The Home tab is the landing view of the Applications section, providing a quick overview:
Applications preview: Shows up to four of the user's Apps, prioritizing those not installed. Each app displays its icon, name, category, and an action button (Open, Install, or Update). Tap View All to navigate to the My Apps tab.
Feature shortcuts: A grid of cards linking to other enabled Self-Service sections (Bookmarks, Status, etc.) for quick access without opening the navigation drawer.
Pull to refresh: Pull down on the screen to refresh the application list from the server.
My Apps Tab
Shows a complete list of all managed applications currently installed on the device, plus any currently being installed. Each app displays:
Icon, name, and category.
An action button: Open (installed and up to date), Update (newer version available), or an animated progress indicator (currently installing).
If no managed apps are installed, the screen displays: "No applications installed."
App Detail Page
Tapping any application opens its full detail page, which includes:
Header: Large app icon, application name, and publisher name.
Compatibility warning: If the app requires a newer Android version than the device is running, a "Not compatible with this device" warning appears, and the Install button is disabled.
Action buttons: Vary based on the app's current state:
App State
Available Actions
Not installed
Install
Not installed (incompatible)
Install (disabled)
Installed
Uninstall and Open
Update available
Uninstall and Update
Installing in progress
Animated loading indicator (no buttons)
Screenshots: A horizontally scrollable carousel. Tapping a screenshot opens it in a full-screen viewer with swipe navigation.
About this app: Application description, initially truncated to three lines. Tap to expand or open a dedicated full-screen reading view.
Information: Metadata including Author, Category, Compatibility, Age Rating (PEGI: 3+, 7+, 12+, 16+, or 18+), and Version number.
Search
The Applications section includes a search feature, accessible via the search icon in the top bar. It provides a real-time filtered list of Apps as the user types, matched against the application name (case-insensitive). Each result has an action button for quick install/open/update actions without visiting the detail page.
How App Installation Works
There are two types of applications, each installed differently:
Corporate applications (Custom Apps). Hosted directly on Applivery. When the user taps Install:
The app icon changes to an animated loading indicator.
A notification appears in the notification bar showing installation progress.
The application file is downloaded from the Applivery servers.
The system's package installer runs.
Once complete, the button changes to Open.
The entire process runs in the background — the user can continue browsing while installation takes place.
Google Play Store applications. When the user taps Install:
The device opens the app's page in the Google Play Store.
The user completes the installation through the Play Store.
When returning to the Applivery Agent, the app automatically detects the installation status and updates in real time — no manual refresh needed.
Bookmarks
The Bookmarks section displays URLs and web links that the organization has shared with the user — such as links to internal tools, documentation, or company portals.
Organization
Bookmarks are grouped into two categories:
Custom: Links configured specifically by the organization's administrator.
Applivery: Links provided by the Applivery Dashboard.
Users can filter between Custom and Applivery, but there is no option to remove the filter and display all bookmarks at once.
Each bookmark displays an icon (if configured), name, description, and an Open button that opens the URL in the device's default browser.
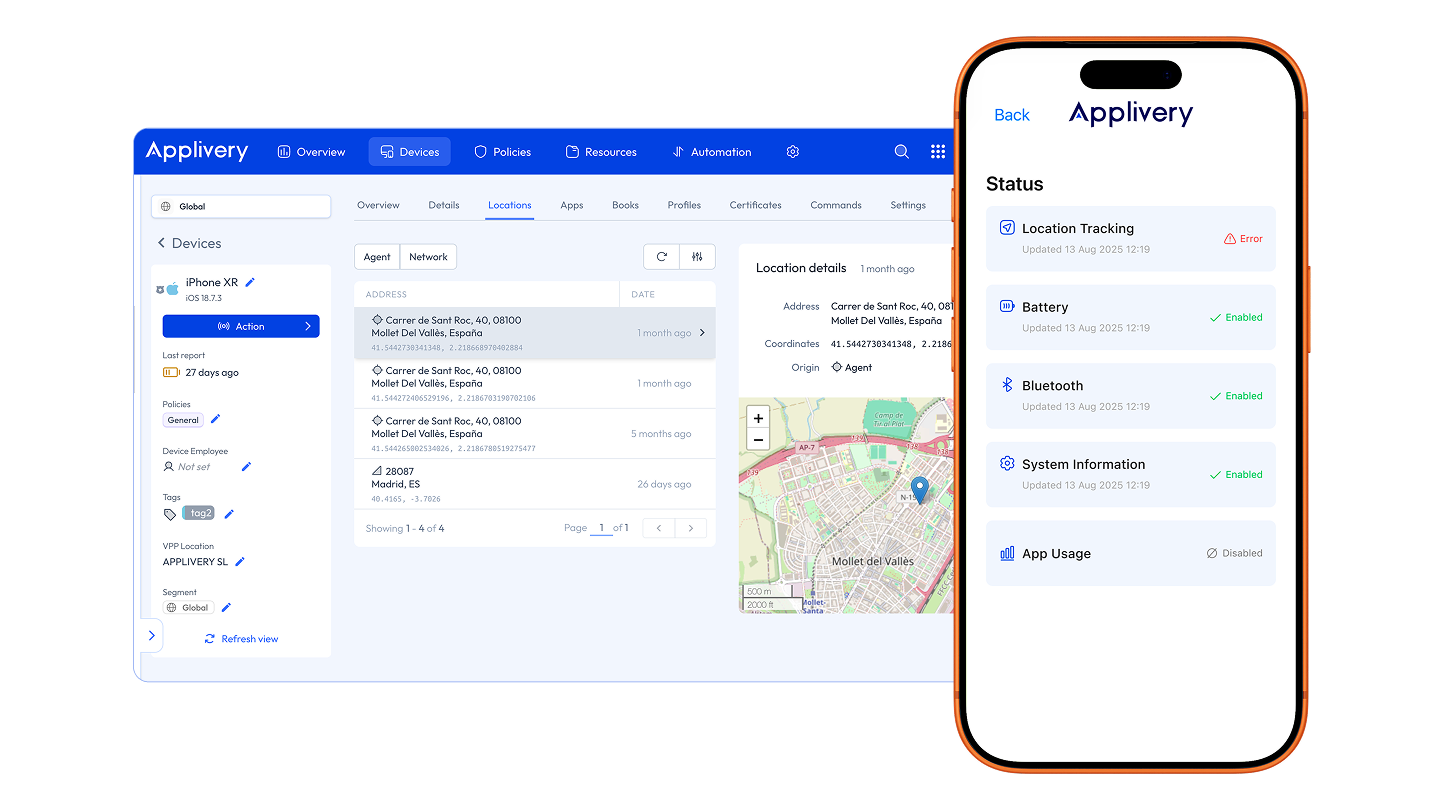
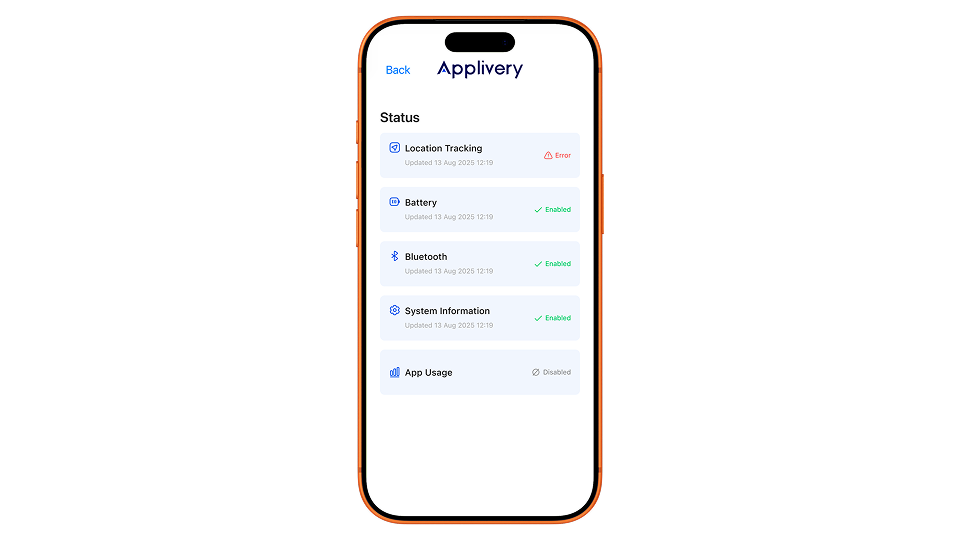
Status
The Status section gives the user visibility into the management Agents (background services) running on their device. Each Agent is responsible for collecting and reporting a specific type of device information to the Applivery Dashboard.
Agents
Agent | What it does |
|---|---|
Location tracking | Reports the device’s geographic location. |
System information | Provides detailed device information, including hardware and OS data. |
Battery | Reports battery status. |
Bluetooth | Reports Bluetooth status. |
Download Resources | Files and resources require user interaction in the Files section. |
Status Indicators
Each Agent is shown as a card with its icon, name, last successful run time, and a color-coded status:
Indicator | Color | Meaning |
|---|---|---|
Enabled | Green | Running normally and reporting on schedule |
Disabled | Gray | Turned off by the administrator for this device |
Error | Orange | A problem occurred (e.g., a required permission was denied) |
If an Agent is currently running, its subtitle shows "Running" instead of a timestamp. Status information updates in real time.
Navigation and Menu
Navigation Drawer
Open the navigation drawer by tapping the menu icon (☰) in the top-left corner. The drawer contains:
A close button (✕).
The Applivery logo.
All enabled sections with their icons: Applications, Files, Bookmarks, Status, Notifications.
Tapping any section switches to that view and closes the drawer.
Back Navigation
When inside a detail screen (app detail, search), the menu icon is replaced by a back arrow. Each main section maintains its own navigation history — returning to a section resumes where the user left off.
Admin Configuration
Administrators control the Self-Service Portal's behavior through the managed configuration Policy in the Applivery Dashboard, which is pushed to devices automatically.
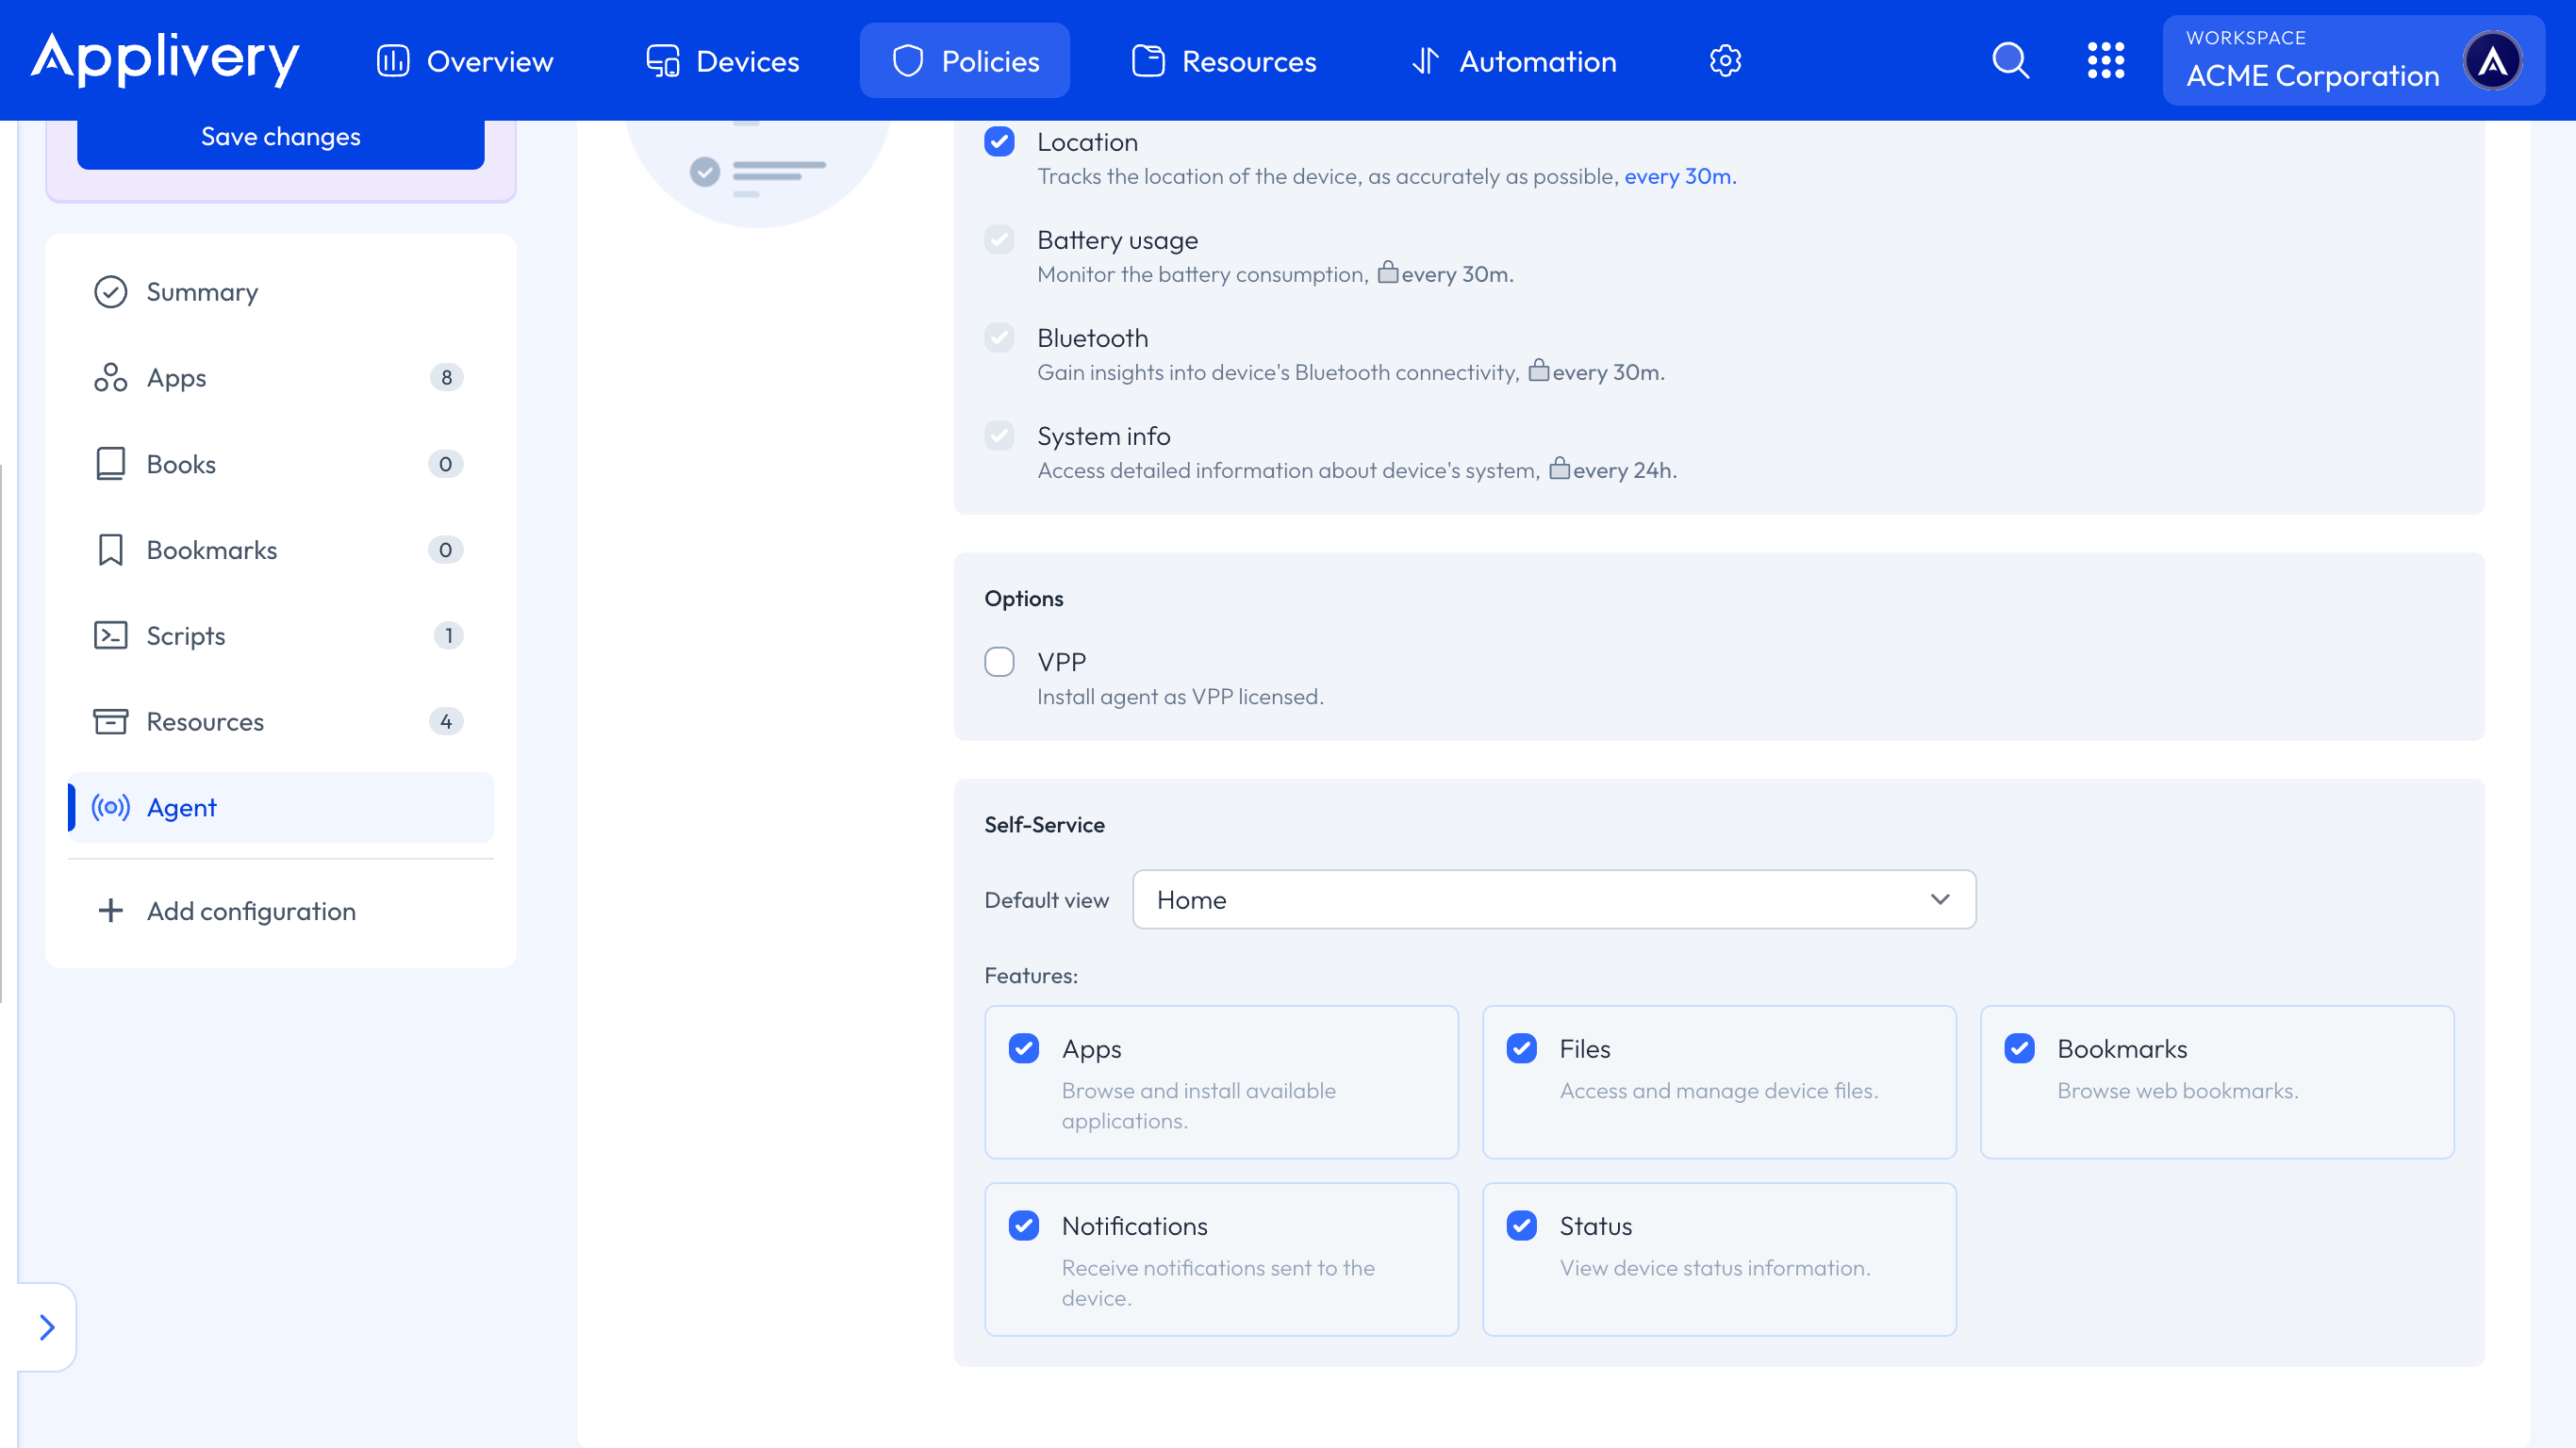
Feature Toggles
Each section of the Self-Service Portal can be independently enabled or disabled:
Feature key | Section |
|---|---|
| Application catalog with install/update/uninstall |
| Organization bookmarks and web links |
| Agent health monitoring dashboard |
| File management |
For each feature, the administrator can configure:
active: Whether the feature appears in the navigation menu (
trueorfalse).defaultView: Whether this feature is the first screen shown when the app opens (
trueorfalse). Only one feature should be set as the default view at a time.
Application Catalog
Applications shown in the Self-Service Portal are managed through the Applivery Dashboard App Management features. The Agent automatically syncs the assigned application list. Administrators control:
Which applications are visible to which devices or groups.
Whether an app is a corporate app (hosted on Applivery) or a Play Store app.
Whether the install type is Available (user-initiated) or Force Install (mandatory).
App metadata: name, description, icon, screenshots, category, age rating, version.
Bookmarks
Bookmarks are configured through the Applivery Dashboard Resources management. They support custom bookmarks (created by the administrator) and Applivery Dashboard bookmarks. Each bookmark has a title, description, URL, and an optional icon.
Resources Management
The Agent handles downloading and installing certificates and files assigned to the device. Certificates (such as SCEP-enrolled certificates) are automatically installed into the device's keystore. Other file types are downloaded and stored on the device.
Device Compatibility
The Applivery Apple MDM Agent v2.0.0 supports:
iOS 16.0 and higher.
iPhone and iPad.
The Self-Service Portal is designed for both portrait and landscape orientations, with optimized layouts for different screen sizes.
Version 2.0.0 is a one-way upgrade. Once a device is updated to v2.0.0, it cannot be downgraded to v1.x without losing local application and certificate data.
Apple places a strong emphasis on user privacy and imposes strict limitations on the capabilities of the Agent application. As a result, only geolocation reporting is allowed through the Agent App.
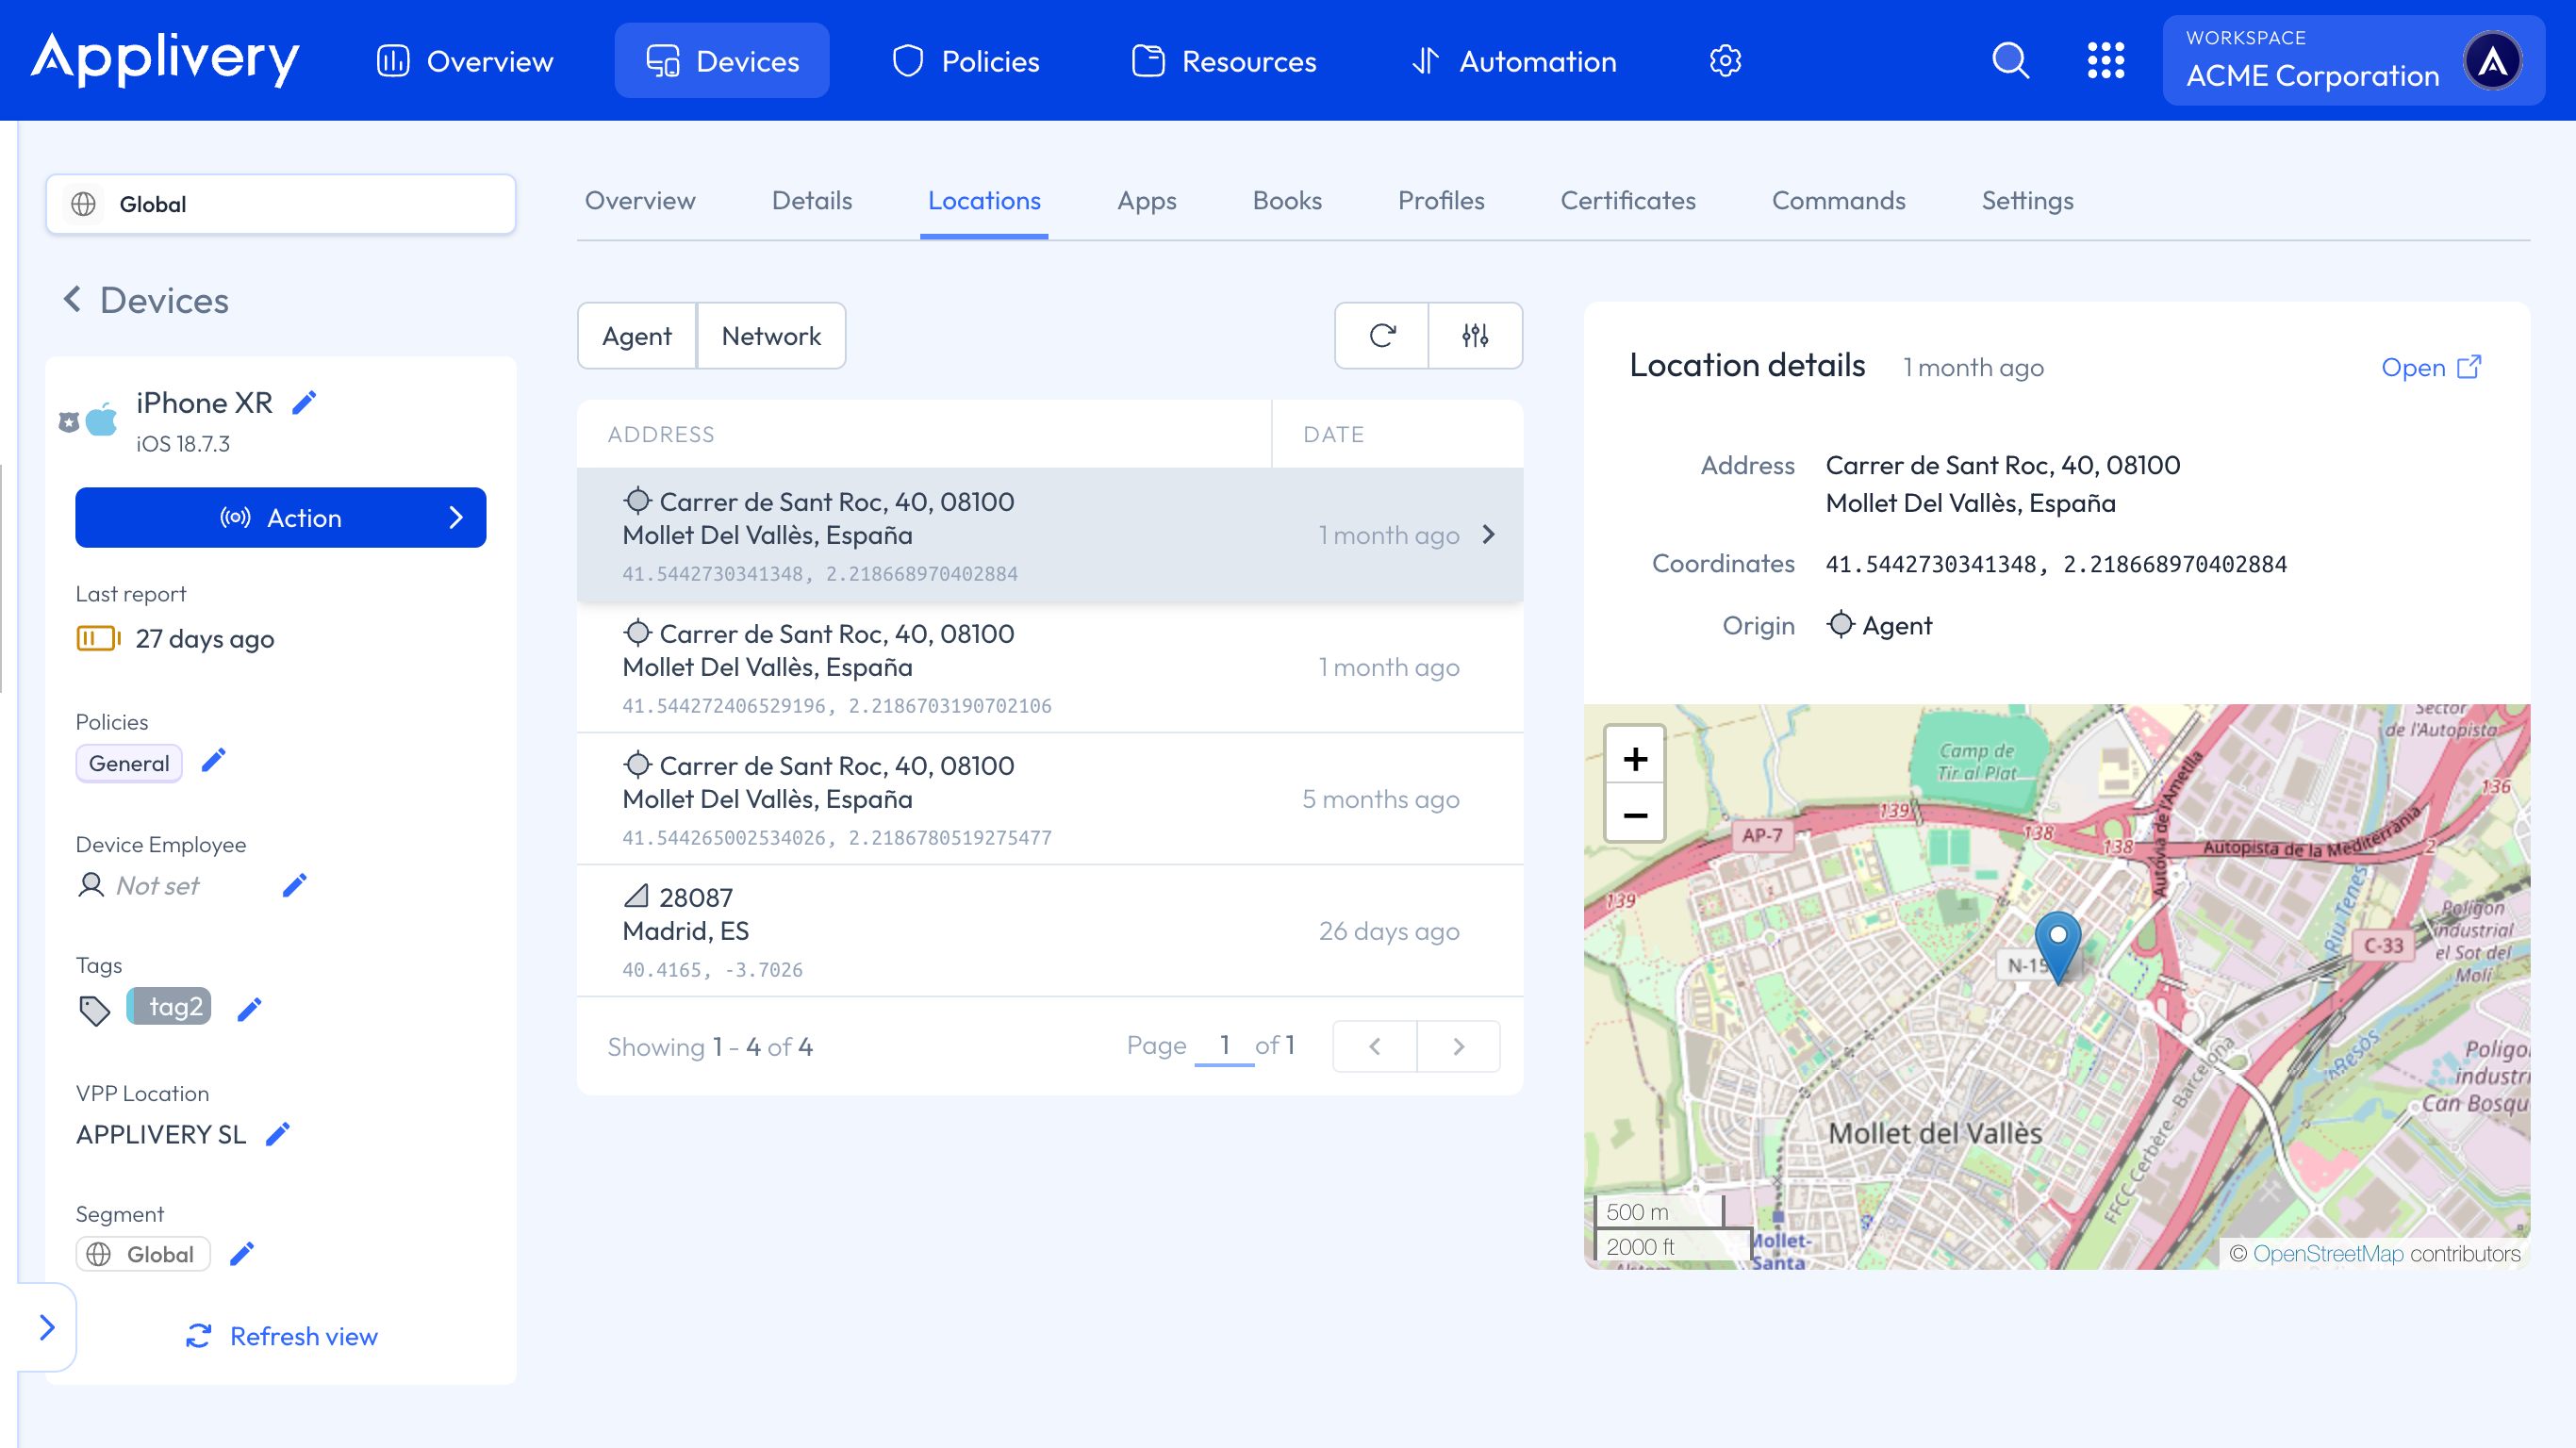
The Agent will report only when the device detects a substantial change in location, exceeding 500 meters.
After installation, users must open the application for the first time and explicitly grant geolocation permissions.
For improved functionality and to prevent the operating system from deprioritizing its execution, granting permanent execution permissions through Settings › Applivery MDM › Location › Always is highly recommended.
The Applivery iOS Agent is available on the App Store, and our platform facilitates its installation through VPP (Volume Purchase Program). It is essential to assign licenses in Apple Business Manager (ABM) to make the Agent available.
The Agent is exclusively compatible with devices running iOS/iPadOS 16.0 or higher.
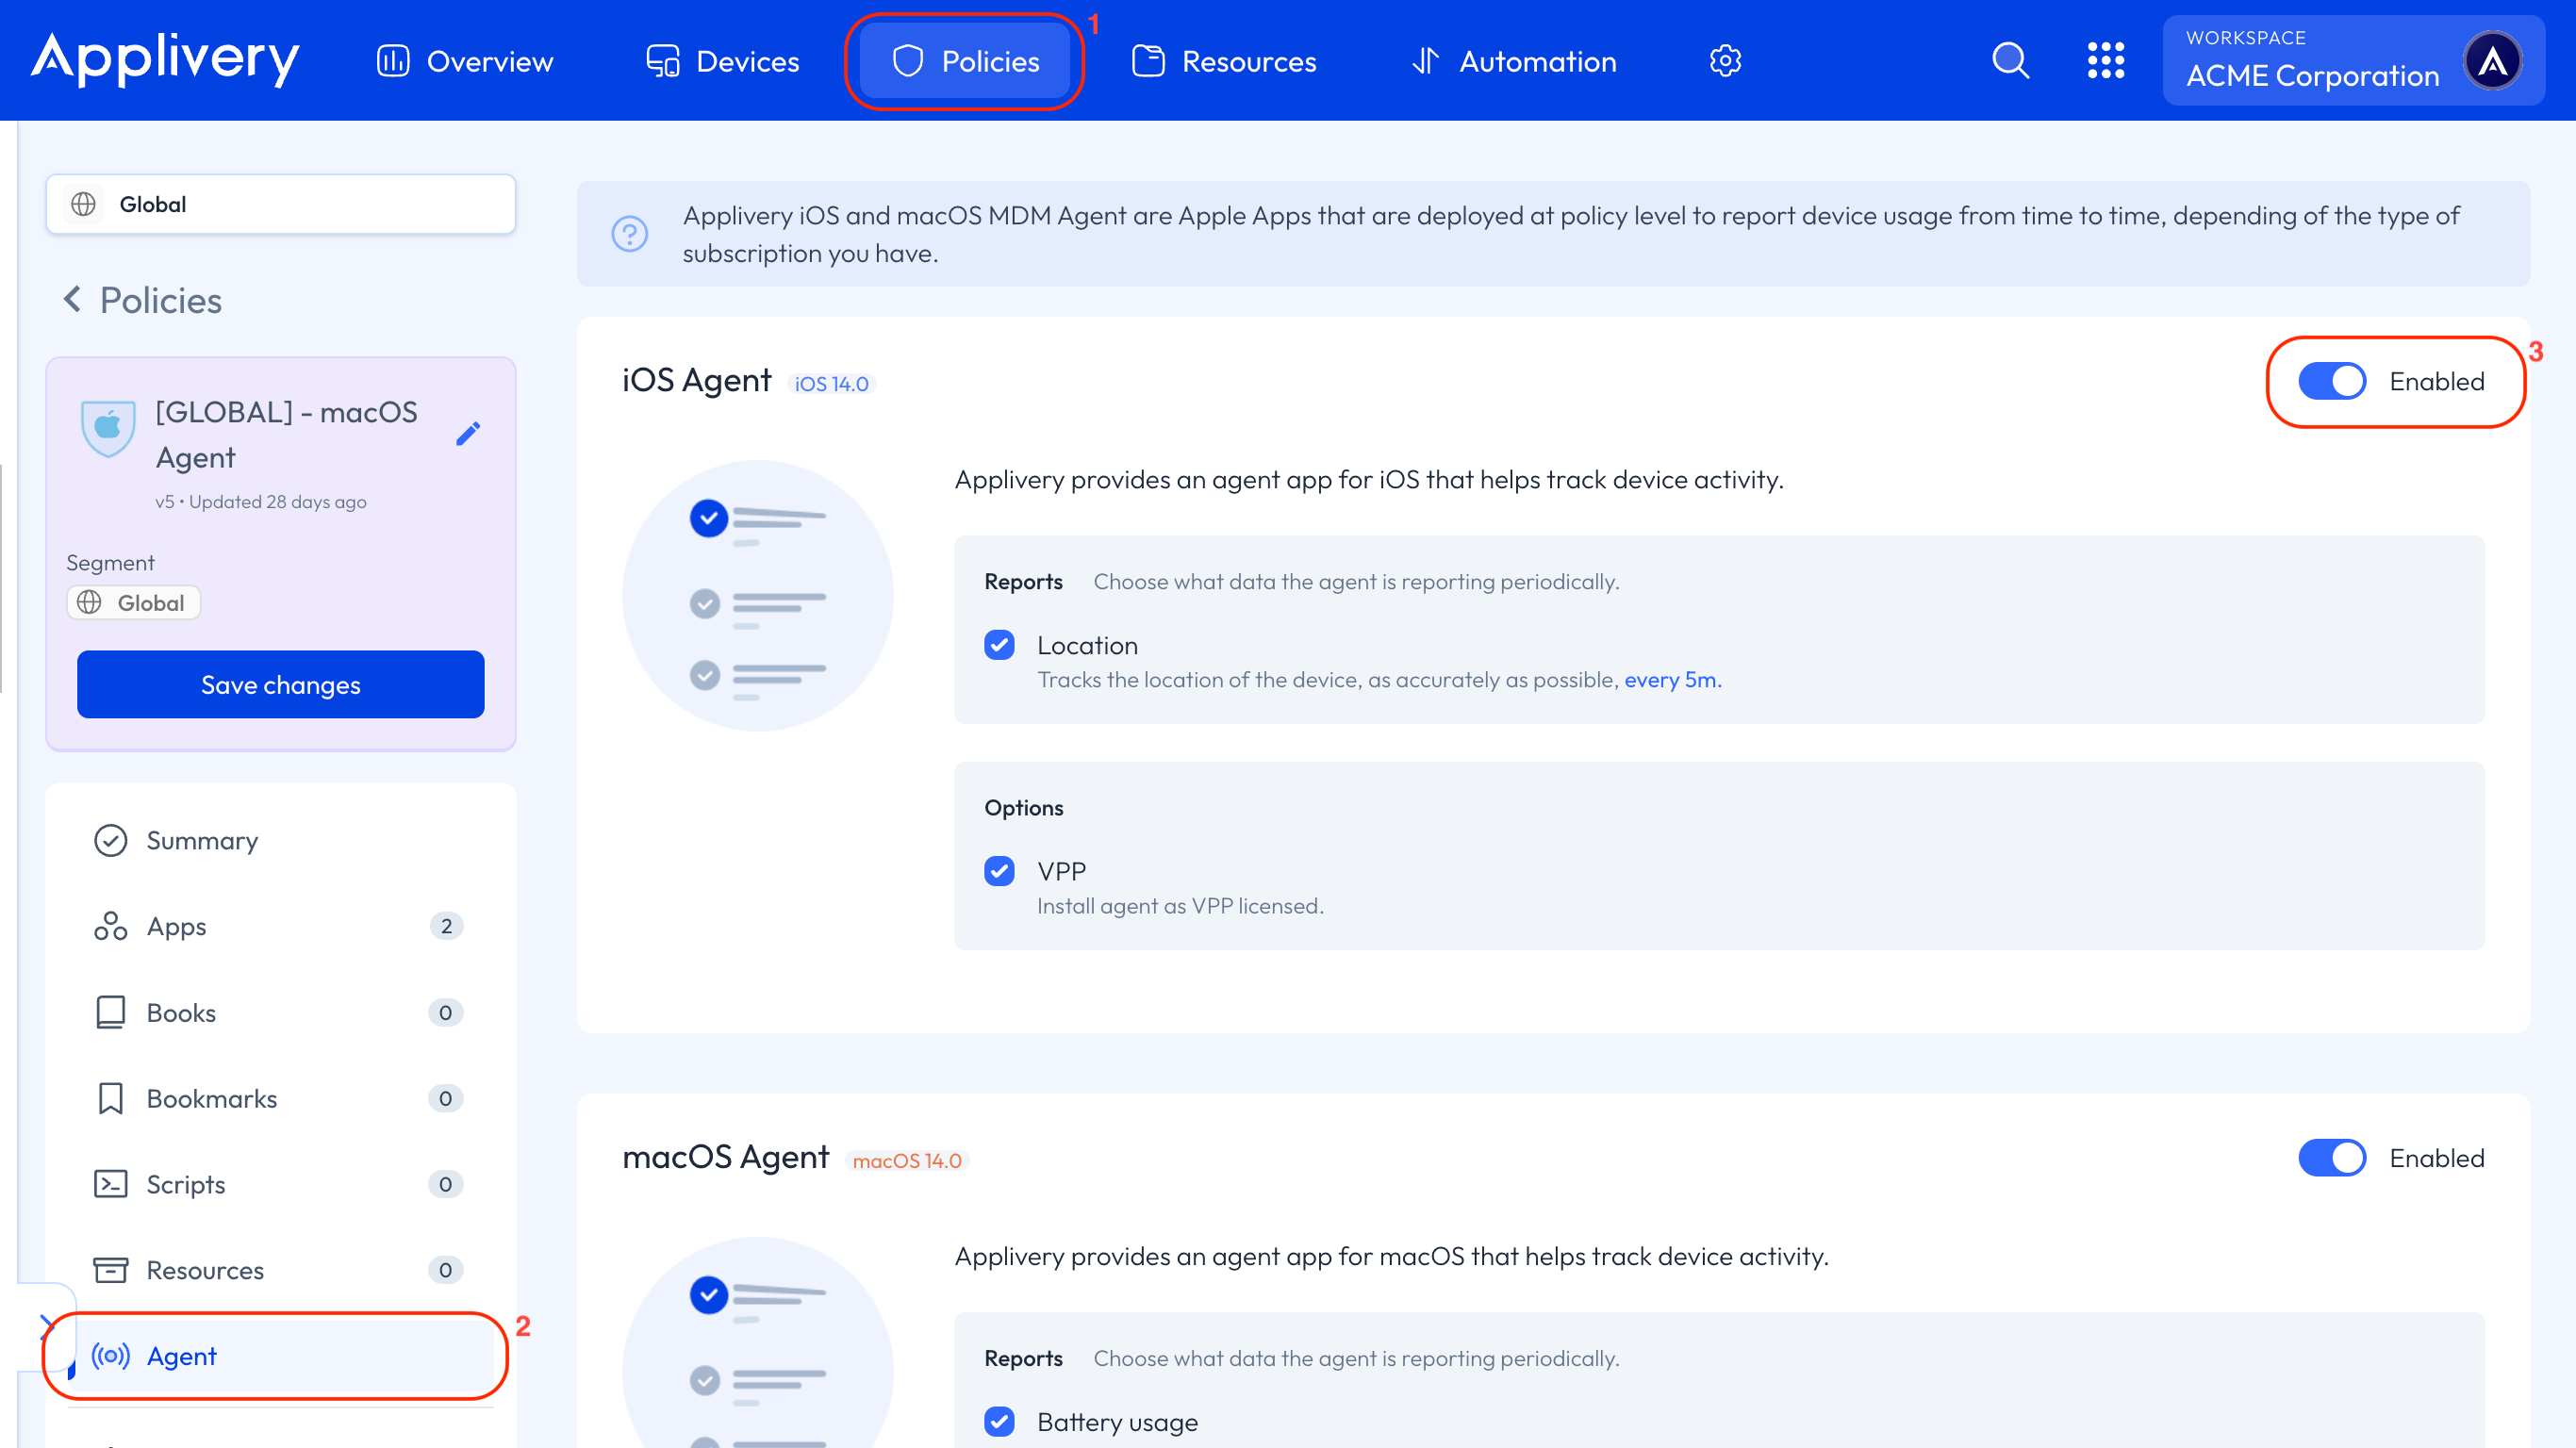
Navigate to any of your Policies (1) within the Applivery Dashboard. In the left-hand menu, click on Agent (2) and enable (2) the iOS Agent, choose to track the device location, and decide whether the Agent should be installed as VPP licensed.