
CrowdStrike Falcon is a powerful, cloud-native security platform designed to deliver industry-leading antivirus and endpoint protection for macOS and Windows Devices. Leveraging cutting-edge technologies such as artificial intelligence (AI) and machine learning (ML), Falcon proactively detects, prevents, and responds to threats before they can impact your systems.
Whether you’re managing a fleet of endpoints or securing a hybrid work environment, CrowdStrike Falcon offers real-time protection, minimal system impact, and robust integration capabilities.
Requirements
To successfully deploy CrowdStrike Falcon on macOS through Applivery, make sure you have the following:
CrowdStrike Falcon client package (
.pkg).Customer Identification (CID) and Grouping Tag provided by CrowdStrike.
Activation Script (for agent licensing).
Full Disk Access policy (via configuration profile).
Custom
.mobileconfigprofile.Web Content Filter Configuration to ensure full protection coverage.
1 Applivery license for App Distribution.
To deploy CrowdStrike Falcon using Applivery, you will need to upload the compressed App package (.zip) to your App Distribution section and configure it with a post-installation activation script.
First, download the CrowdStrike Falcon .pkg installer from your CrowdStrike Dashboard and make sure to copy your CID and Grouping Tag, as you’ll need these later for the activation script.
Once downloaded, compress the .pkg file by right-clicking on it and selecting Compress, which will generate a .zip file.
Next, log in to the Applivery Dashboard and navigate to the App Distribution section. From there, follow the steps outlined in our documentation:
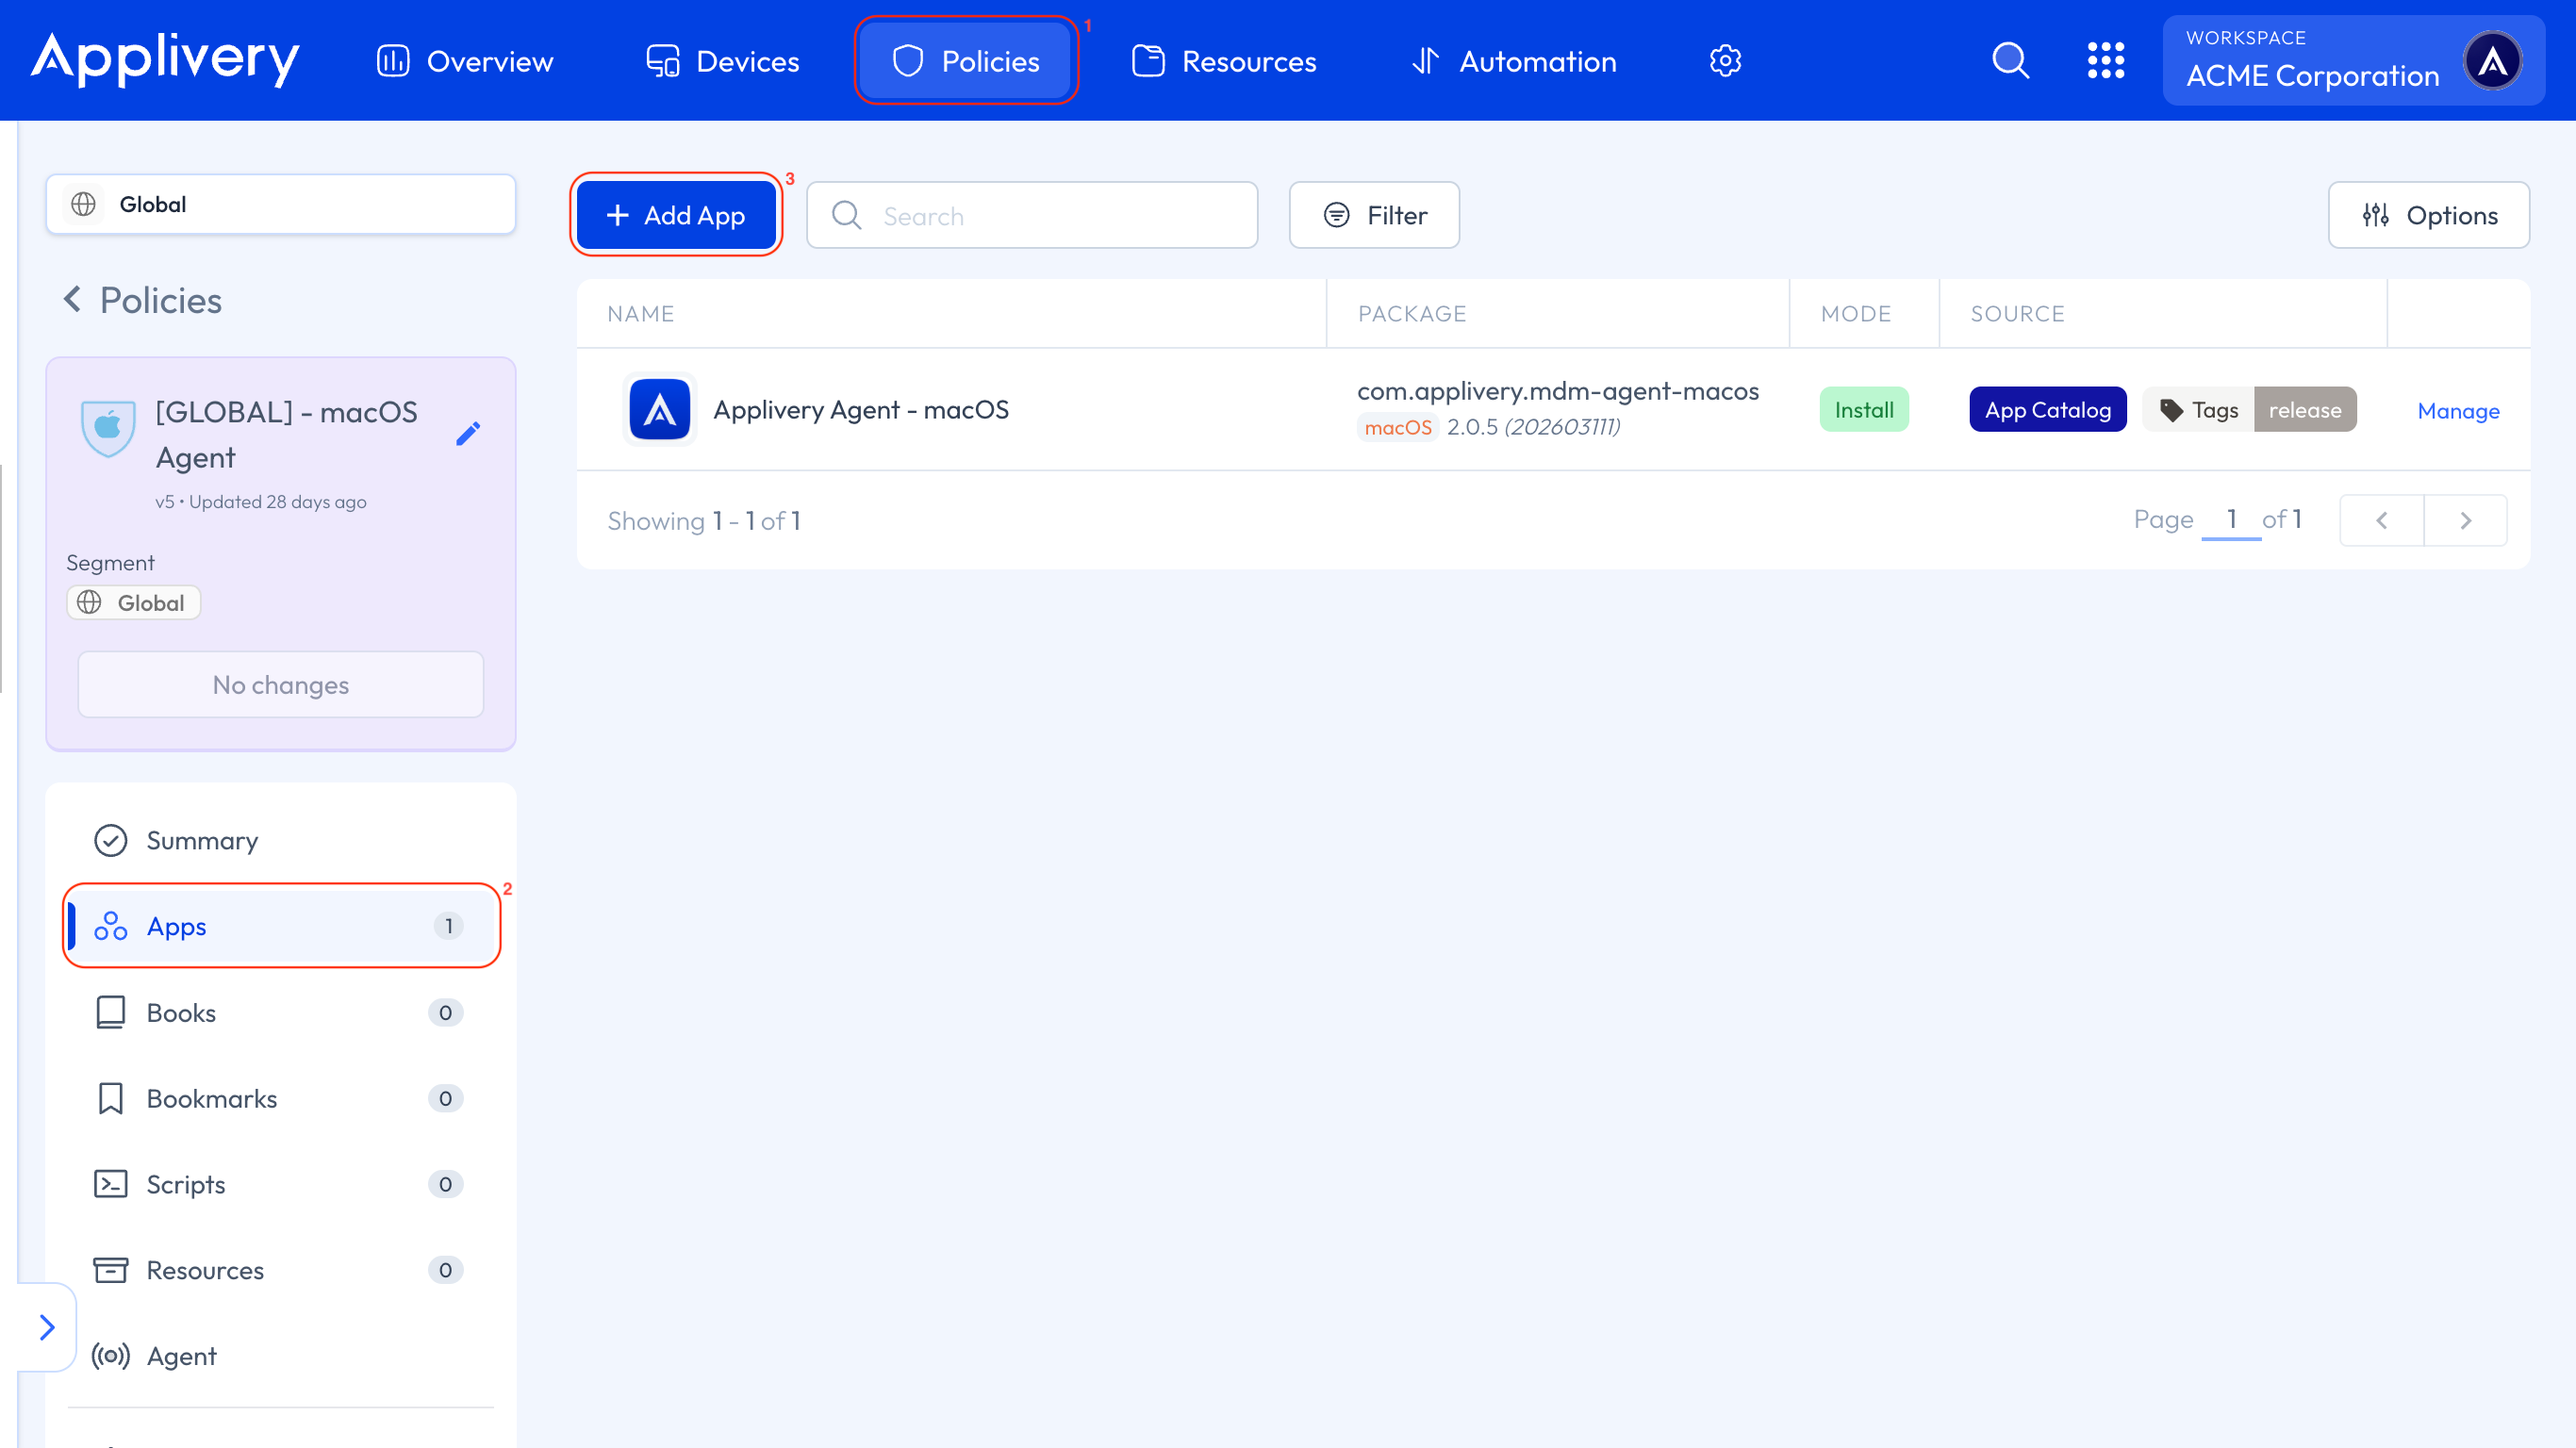
Next, head to the Device Management section and select any of your Policies (1) or create a new one. From the left-hand menu, select the Apps (2) section and click the + Add App (3) button.
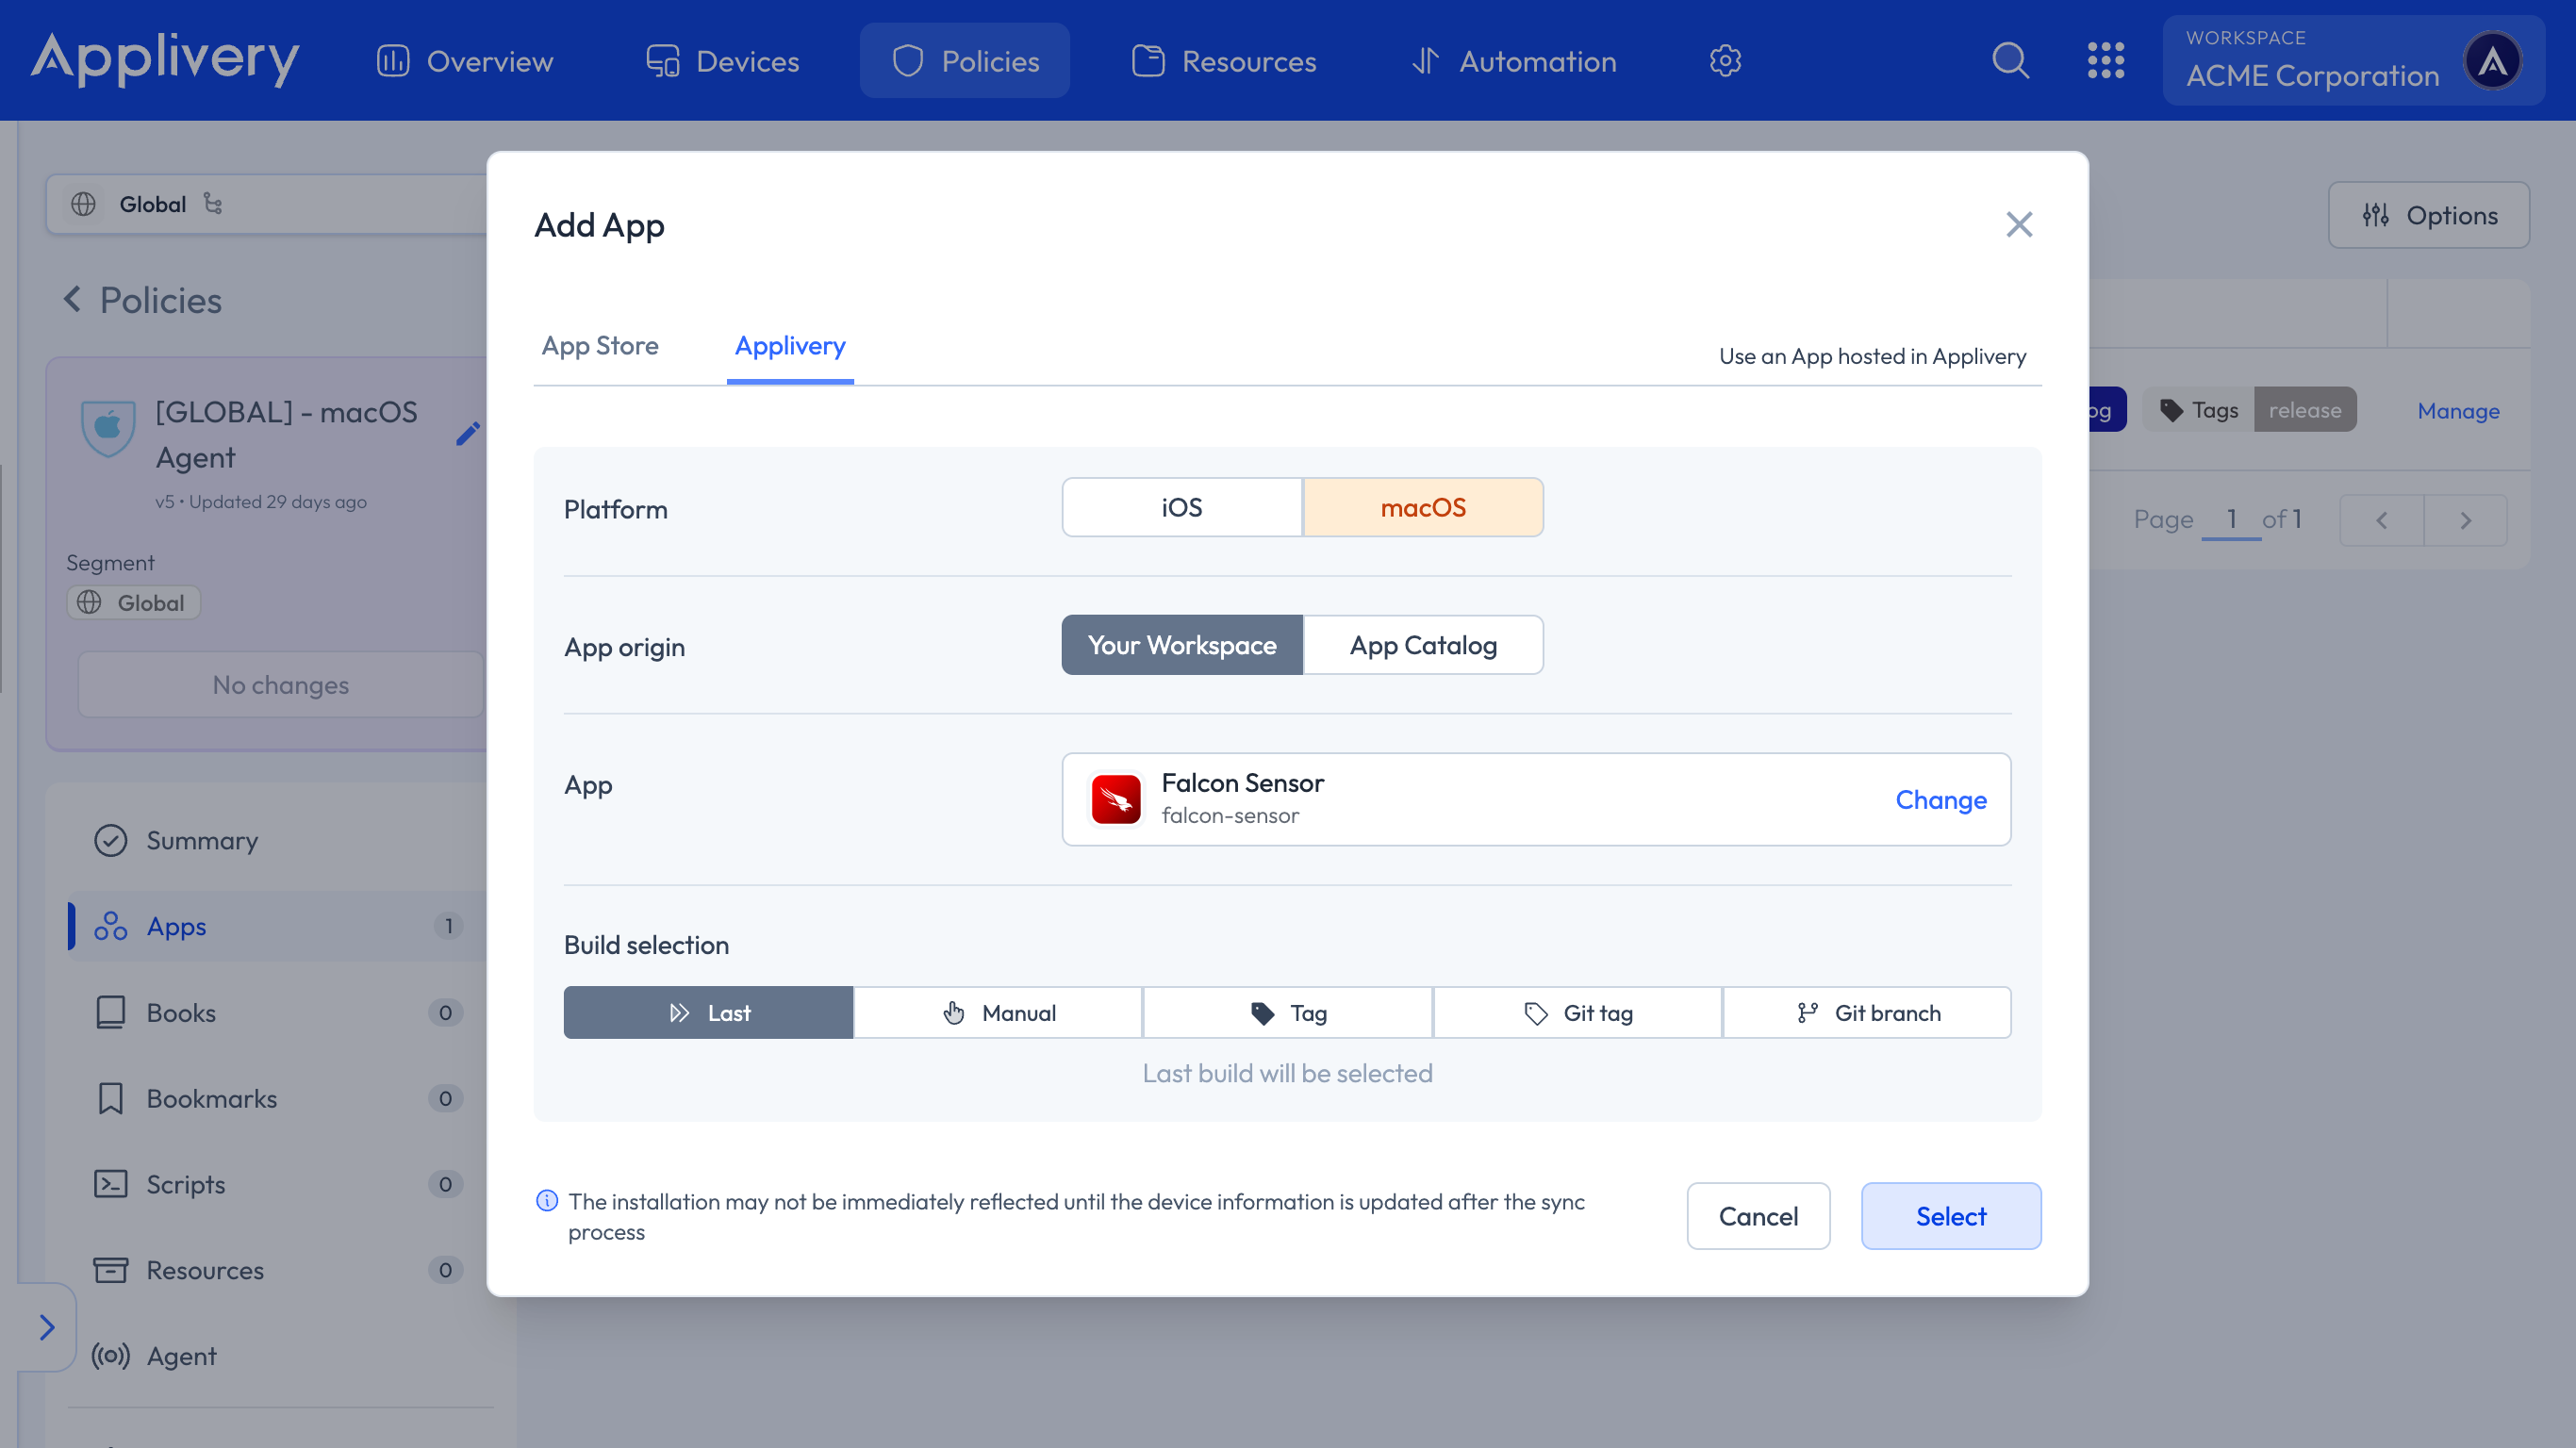
In the modal view, navigate to the Applivery tab. Set the platform to macOS, choose Your Workspace as the App origin, and search for the Falcon Sensor App you previously created. For the Build selection, choose Last to ensure the latest version is always deployed.
Continue to the next step and select your preferred install mode—Force Install, Required for setup, or Available—depending on your deployment strategy.
In the Configuration section, select Post-install (9) and paste your Activation Script, making sure to replace the placeholder values with your actual CID and Grouping Tag.
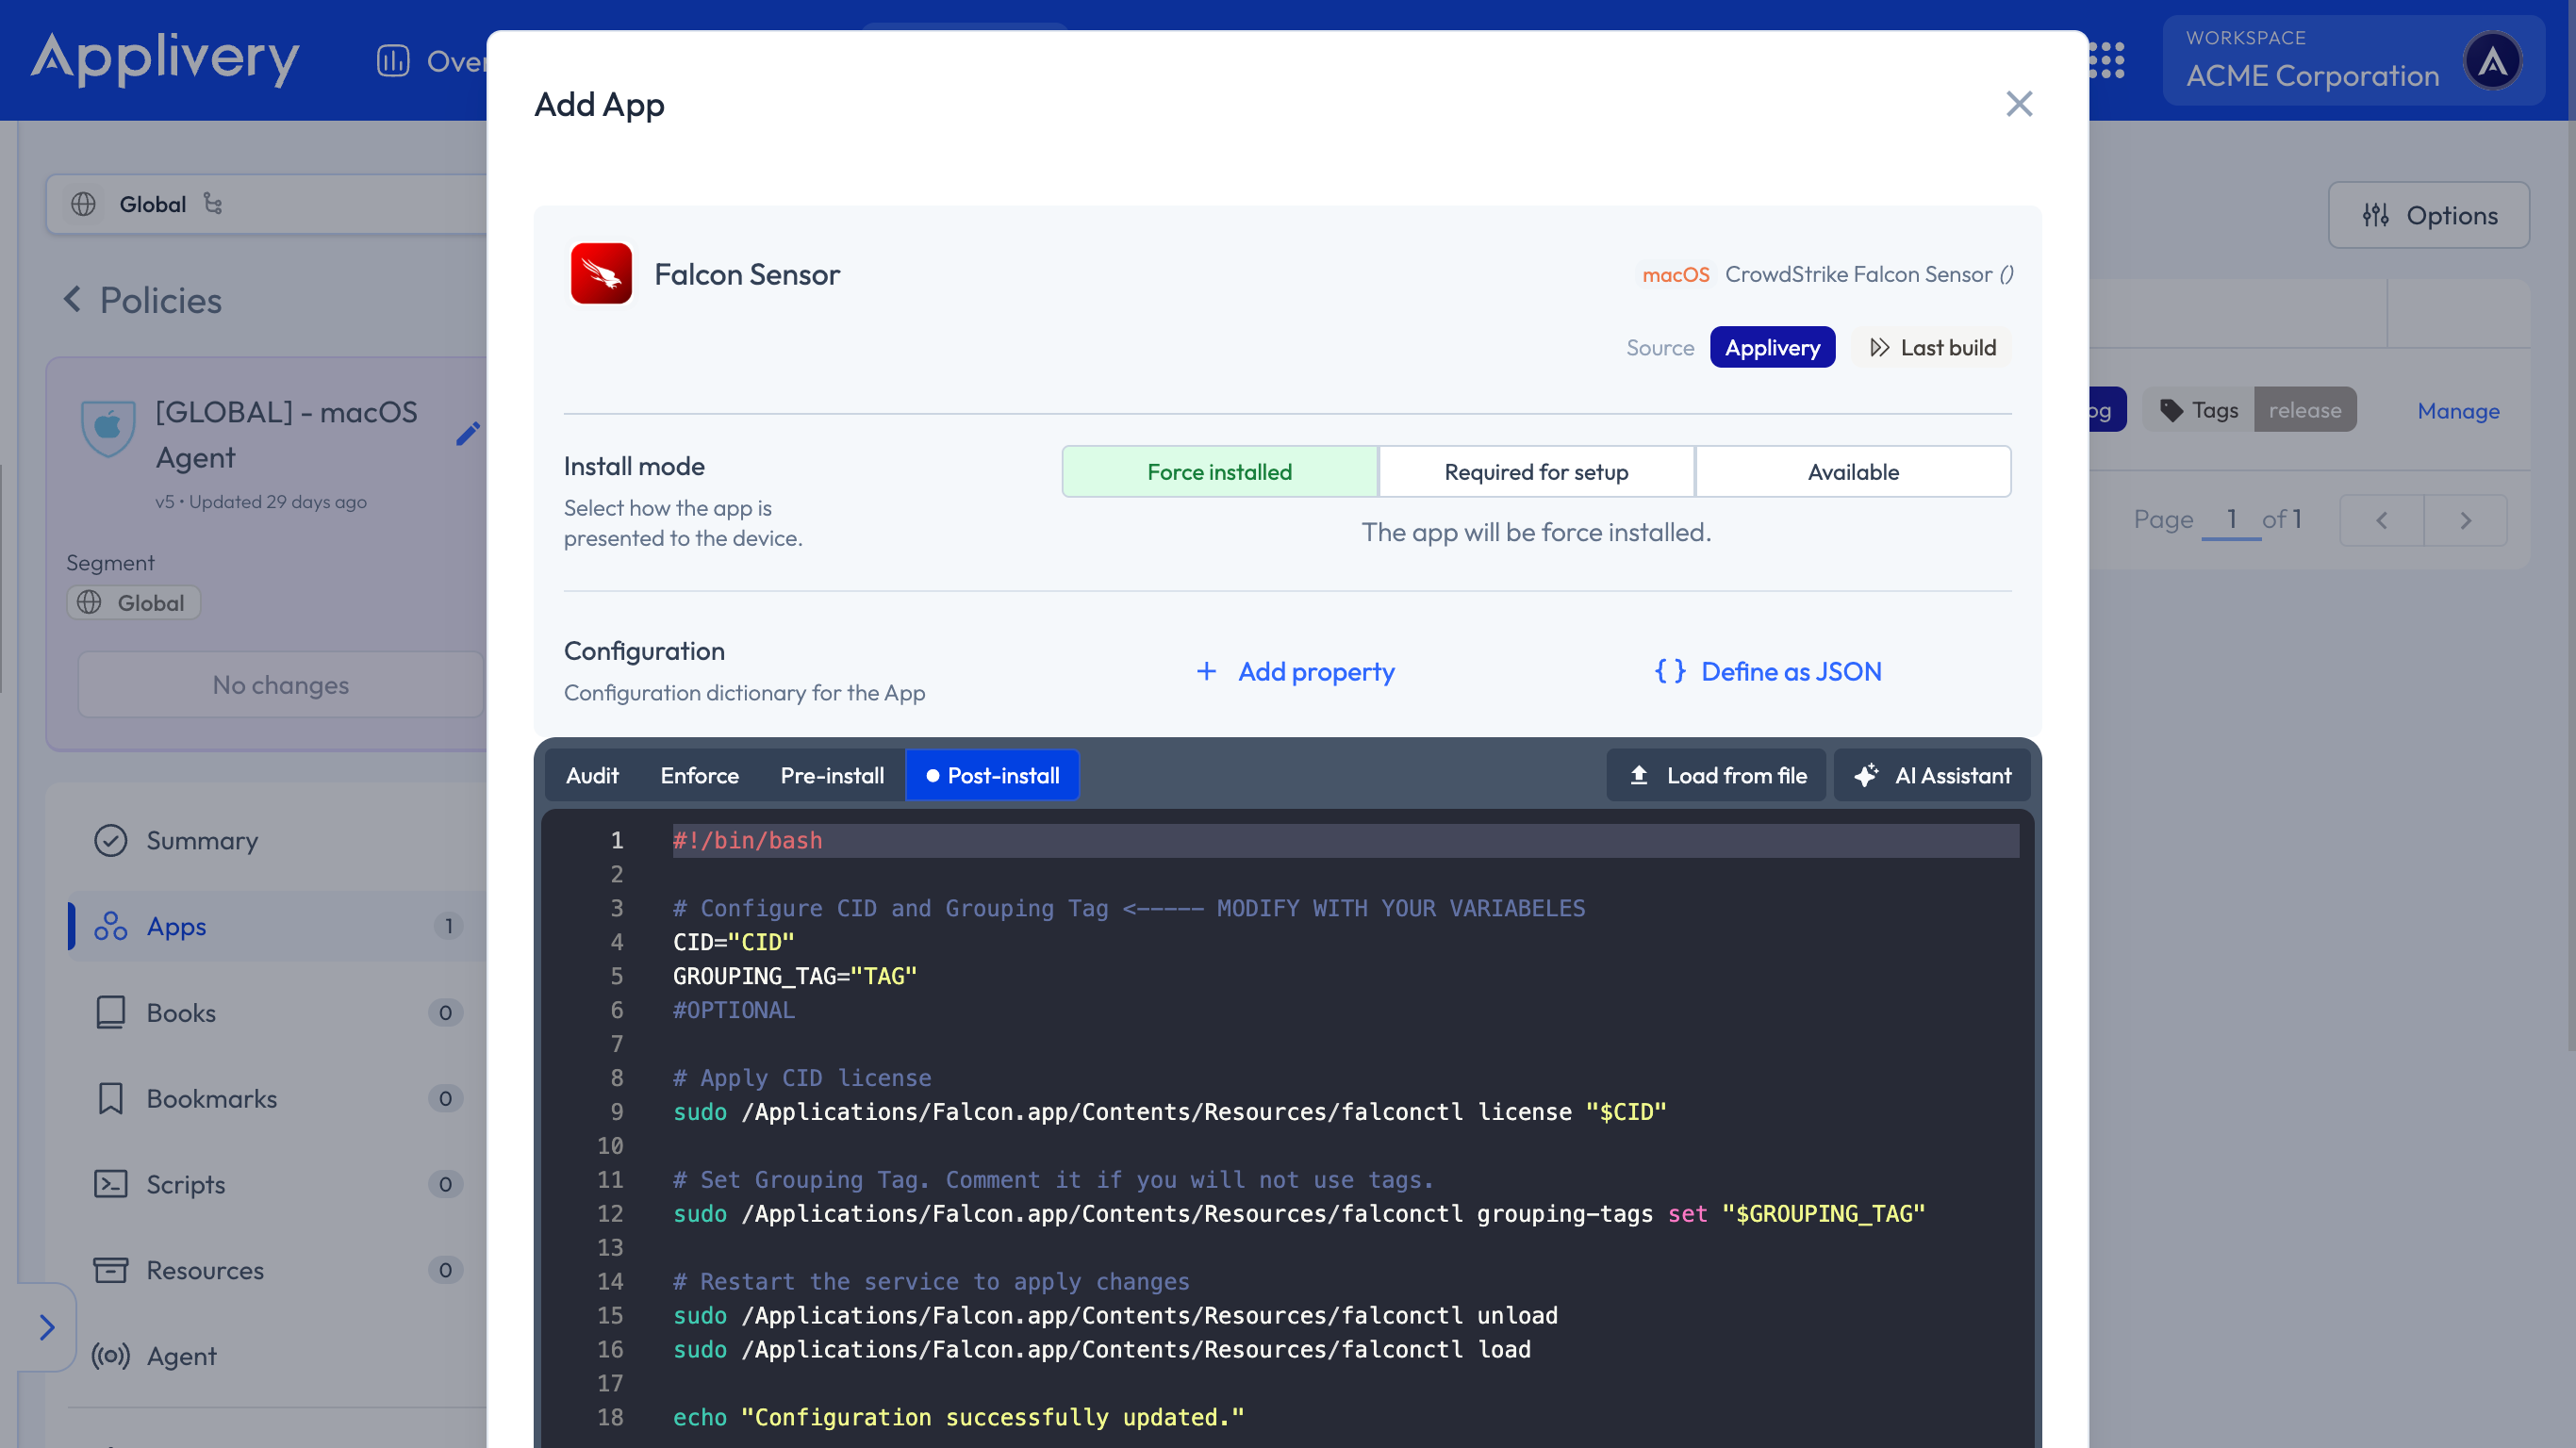
#!/bin/bash

# Configure CID and Grouping Tag <----- MODIFY WITH YOUR VARIABELES
CID="CID"
GROUPING_TAG="TAG"
#OPTIONAL

# Apply CID license
sudo /Applications/Falcon.app/Contents/Resources/falconctl license "$CID"

# Set Grouping Tag. Comment it if you will not use tags.
sudo /Applications/Falcon.app/Contents/Resources/falconctl grouping-tags set "$GROUPING_TAG"

# Restart the service to apply changes
sudo /Applications/Falcon.app/Contents/Resources/falconctl unload
sudo /Applications/Falcon.app/Contents/Resources/falconctl load

echo "Configuration successfully updated."
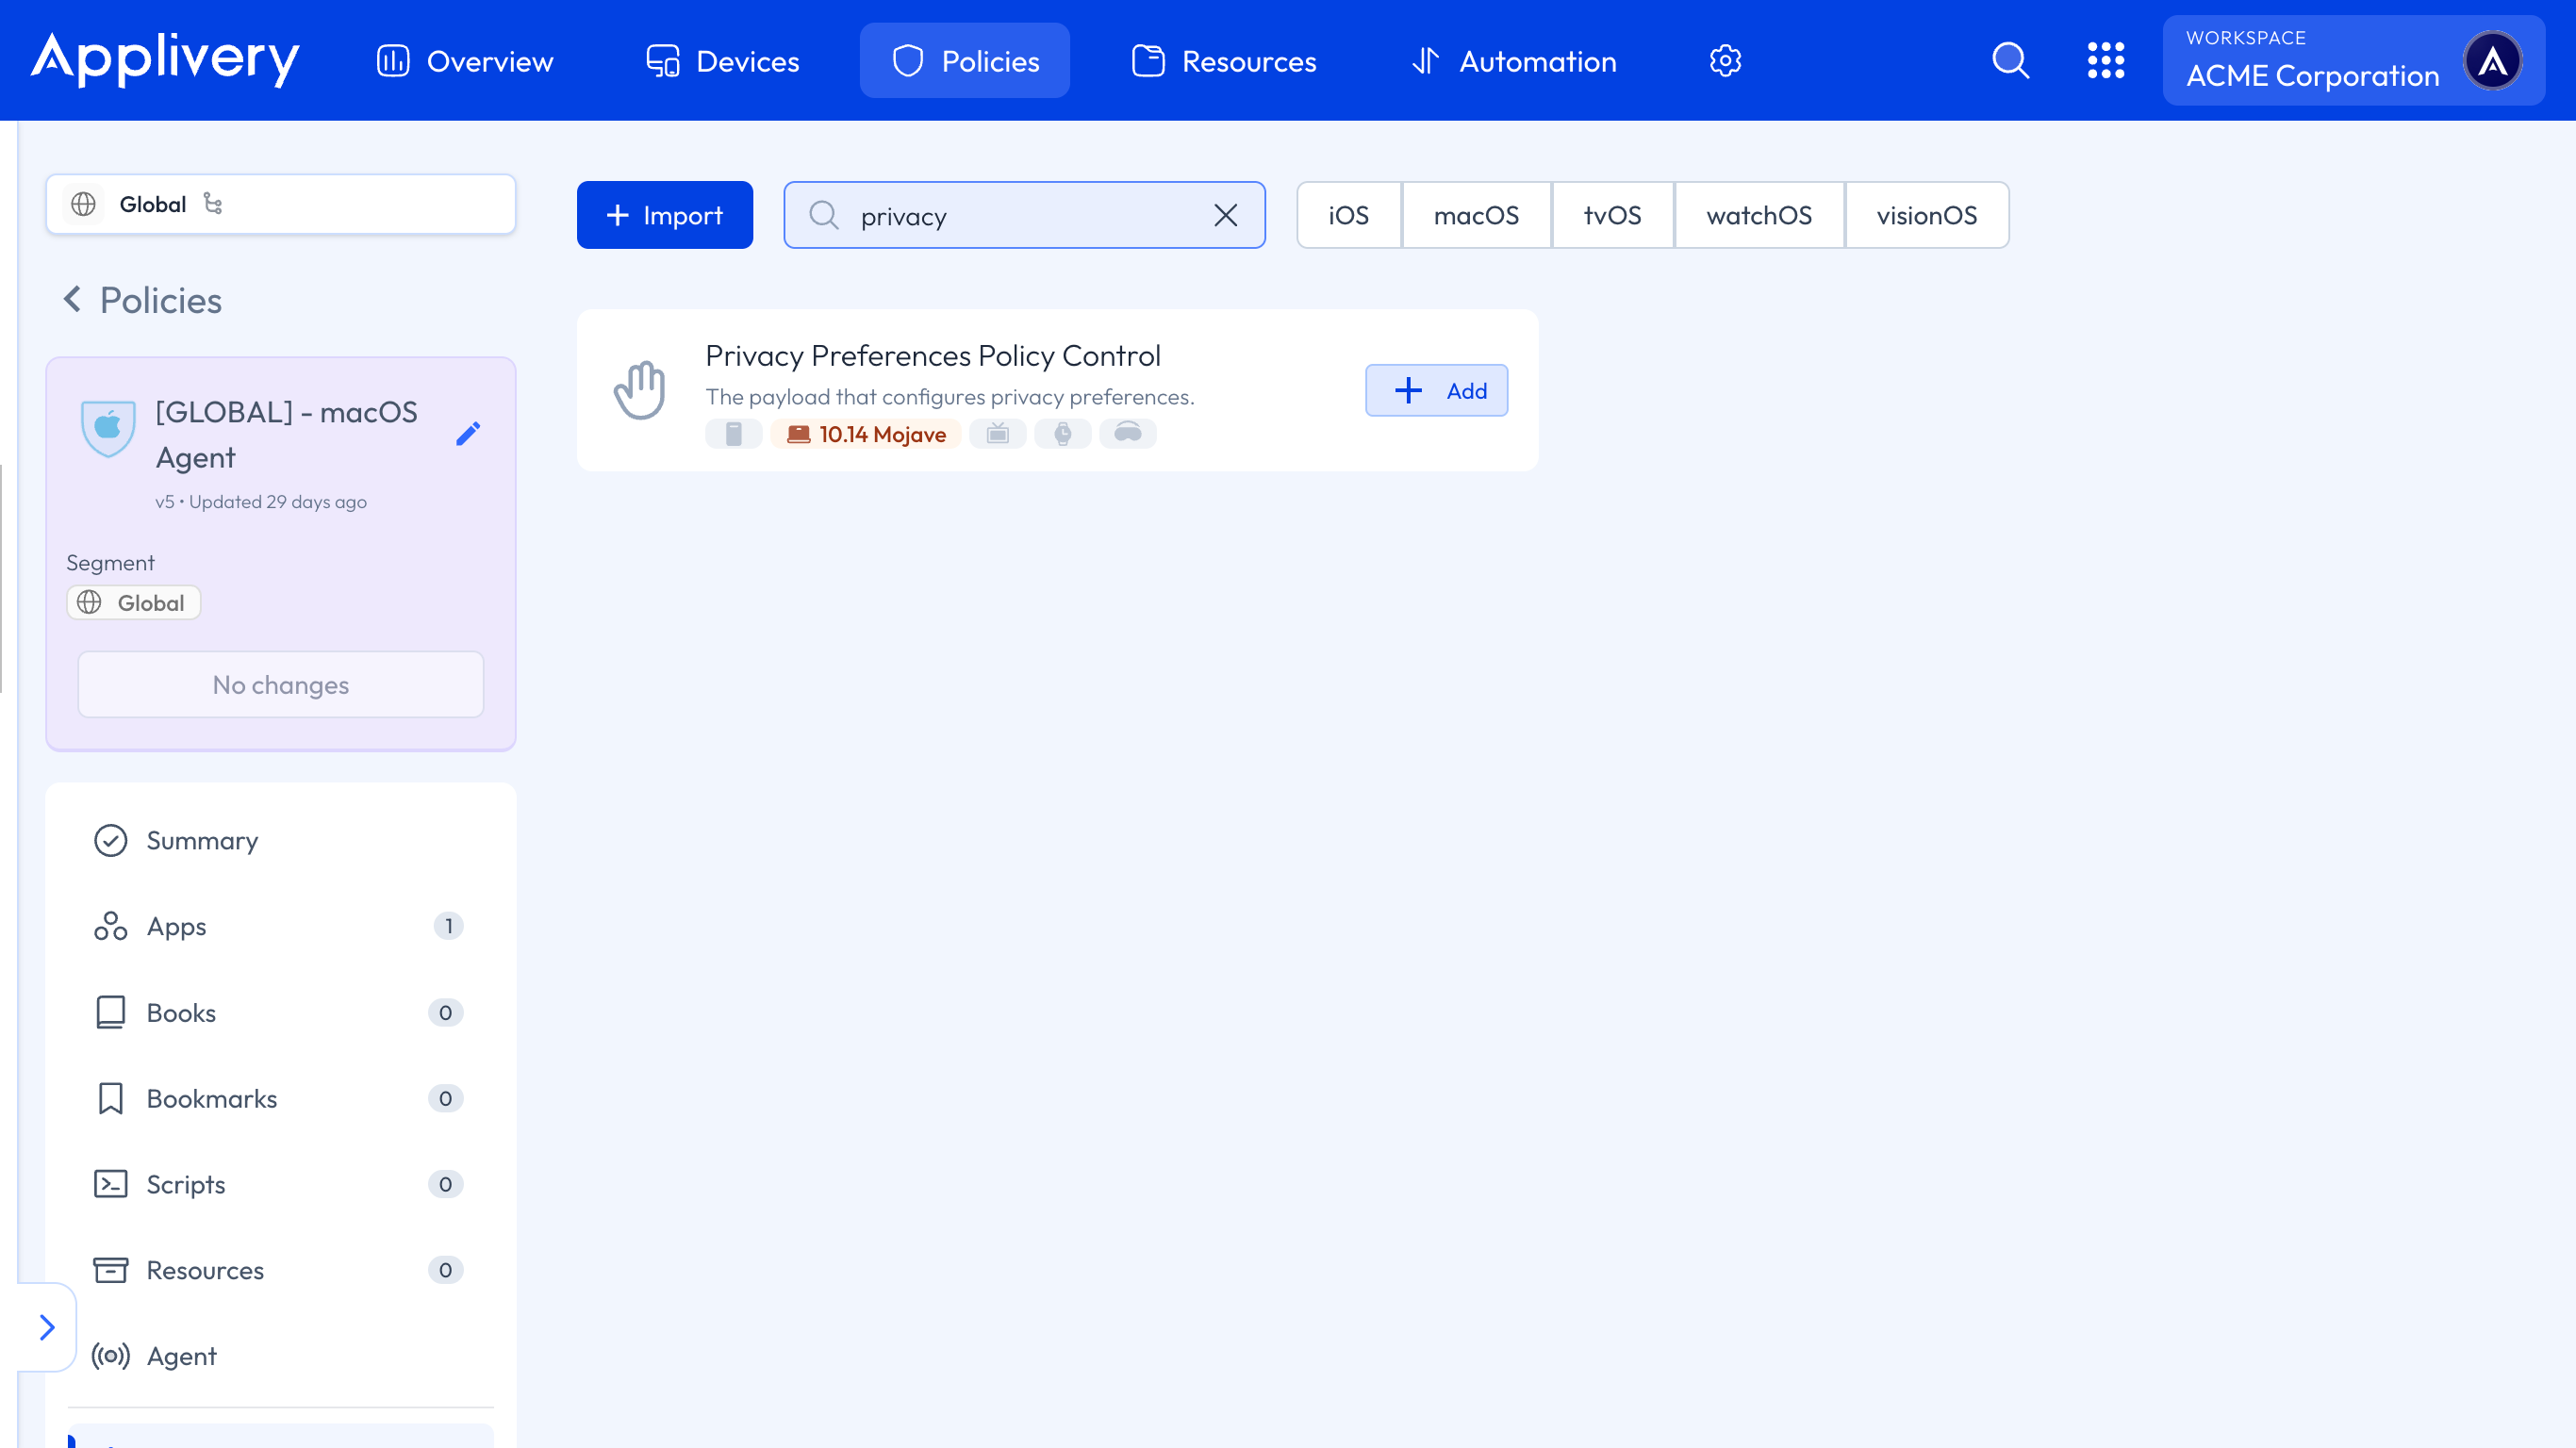
To ensure the proper functioning of the App after installation, we must grant it Full Disk Access permissions. Within the Policy, select +Add Configuration from the left-hand menu, then choose Privacy Preferences Policy Control.
Next, we’ll add two entries related to System Policy All Files. For each element added to this configuration, set the access to Allowed.
The first configuration should include the following params:
- Code requirement:
identifier "com.crowdstrike.falcon.Agent" and anchor apple generic and certificate 1[field.1.2.840.113635.100.6.2.6] /* exists / and certificate leaf[field.1.2.840.113635.100.6.1.13] / exists */ and certificate leaf[subject.OU] = X9E956P446
Identifier:
com.crowdstrike.falcon.Agent.Identifier Type: Bundle ID.
Static Code: Disabled.
For the second configuration:
- Code requirement:
identifier "com.crowdstrike.falcon.App" and anchor apple generic and certificate 1[field.1.2.840.113635.100.6.2.6] /* exists / and certificate leaf[field.1.2.840.113635.100.6.1.13] / exists */ and certificate leaf[subject.OU] = X9E956P446
Identifier:
com.crowdstrike.falcon.App.Identifier Type: Bundle ID.
Static Code: Disabled.
To apply the custom configuration, navigate to the desired Policy and click + Add configuration from the menu on the left-hand side. Then, select the + Import button and paste the provided .xml content into the editor:
<?xml version="1.0" encoding="UTF-8"?>
<!DOCTYPE plist PUBLIC "-//Apple//DTD PLIST 1.0//EN" "http://www.apple.com/DTDs/PropertyList-1.0.dtd">
<plist version="1.0">
<dict>
	<key>PayloadDescription</key>
	<string>Network Content Filter, System Extensions, and Privacy Preferences</string>
	<key>PayloadDisplayName</key>
	<string>Crowdstrike Settings</string>
	<key>PayloadEnabled</key>
	<true/>
	<key>PayloadIdentifier</key>
	<string>com.applivery.crowdstrike</string>
	<key>PayloadOrganization</key>
	<string>Applivery, Inc.</string>
	<key>PayloadRemovalDisallowed</key>
	<false/>
	<key>PayloadScope</key>
	<string>System</string>
	<key>PayloadType</key>
	<string>Configuration</string>
	<key>PayloadUUID</key>
	<string>bbc888dc-6f2c-479d-9f3a-ce0593e6420e</string>
	<key>PayloadVersion</key>
	<integer>1</integer>
	<key>PayloadContent</key>
	<array>
		<dict>
			<key>FilterBrowsers</key>
			<false/>
			<key>FilterDataProviderBundleIdentifier</key>
			<string>com.crowdstrike.falcon.Agent</string>
			<key>FilterDataProviderDesignatedRequirement</key>
			<string>identifier "com.crowdstrike.falcon.Agent" and anchor apple generic and certificate 1[field.1.2.840.113635.100.6.2.6] and certificate leaf[field.1.2.840.113635.100.6.1.13] and certificate leaf[subject.OU] = "X9E956P446"</string>
			<key>FilterGrade</key>
			<string>inspector</string>
			<key>FilterPacketProviderBundleIdentifier</key>
			<string>com.crowdstrike.falcon.Agent</string>
			<key>FilterPacketProviderDesignatedRequirement</key>
			<string>identifier "com.crowdstrike.falcon.Agent" and anchor apple generic and certificate 1[field.1.2.840.113635.100.6.2.6] and certificate leaf[field.1.2.840.113635.100.6.1.13] and certificate leaf[subject.OU] = "X9E956P446"</string>
			<key>FilterPackets</key>
			<false/>
			<key>FilterSockets</key>
			<true/>
			<key>FilterType</key>
			<string>Plugin</string>
			<key>Organization</key>
			<string>CrowdStrike Inc.</string>
			<key>PayloadDisplayName</key>
			<string>Web Content Filter</string>
			<key>PayloadIdentifier</key>
			<string>io.applivery.crowdstrike.2C5CBFD0-7CFE-41CB-95BC-A681F4D293B8</string>
			<key>PayloadType</key>
			<string>com.apple.webcontent-filter</string>
			<key>PayloadUUID</key>
			<string>2C5CBFD0-8CFE-41CB-95BC-A681F4D293B8</string>
			<key>PayloadVersion</key>
			<integer>1</integer>
			<key>PluginBundleID</key>
			<string>com.crowdstrike.falcon.App</string>
			<key>UserDefinedName</key>
			<string>Falcon</string>
		</dict>
		<dict>
			<key>AllowUserOverrides</key>
			<true/>
			<key>AllowedSystemExtensionTypes</key>
			<dict>
				<key>X9E956P446</key>
				<array>
					<string>EndpointSecurityExtension</string>
					<string>NetworkExtension</string>
				</array>
			</dict>
			<key>AllowedSystemExtensions</key>
			<dict>
				<key>X9E956P446</key>
				<array>
					<string>com.crowdstrike.falcon.Agent</string>
				</array>
			</dict>
			<key>NonRemovableFromUISystemExtensions</key>
			<dict>
				<key>X9E956P446</key>
				<array>
					<string>com.crowdstrike.falcon.Agent</string>
				</array>
			</dict>
			<key>PayloadDescription</key>
			<string>Configures System Extensions Policy settings</string>
			<key>PayloadDisplayName</key>
			<string>System Extensions</string>
			<key>PayloadIdentifier</key>
			<string>20258B06-5889-4424-8893-A3AF1AFAAEDC</string>
			<key>PayloadOrganization</key>
			<string>CrowdStrike Inc.</string>
			<key>PayloadType</key>
			<string>com.apple.system-extension-policy</string>
			<key>PayloadUUID</key>
			<string>20258B06-5889-4424-8893-A3AF1AFAAEDC</string>
			<key>PayloadVersion</key>
			<integer>1</integer>
		</dict>
		<dict>
			<key>NotificationSettings</key>
			<array>
				<dict>
					<key>BundleIdentifier</key>
					<string>com.crowdstrike.falcon.UserAgent</string>
					<key>NotificationsEnabled</key>
					<true/>
				</dict>
			</array>
			<key>PayloadDisplayName</key>
			<string>Notifications</string>
			<key>PayloadIdentifier</key>
			<string>61090B22-3DCD-435E-ABB2-BE997B3CB78D</string>
			<key>PayloadType</key>
			<string>com.apple.notificationsettings</string>
			<key>PayloadUUID</key>
			<string>61090B22-3DCD-435E-ABB2-BE997B3CB78D</string>
			<key>PayloadVersion</key>
			<integer>1</integer>
		</dict>
		<dict>
			<key>PayloadDescription</key>
			<string>Configures Privacy Preferences Policy Control settings</string>
			<key>PayloadDisplayName</key>
			<string>Privacy Preferences</string>
			<key>PayloadIdentifier</key>
			<string>9A10BE5D-5E57-4C22-89C9-20597A04B616</string>
			<key>PayloadOrganization</key>
			<string>CrowdStrike Inc.</string>
			<key>PayloadType</key>
			<string>com.apple.TCC.configuration-profile-policy</string>
			<key>PayloadUUID</key>
			<string>9A10BE5D-5E57-4C22-89C9-20597A04B616</string>
			<key>PayloadVersion</key>
			<integer>1</integer>
			<key>Services</key>
			<dict
Once done, make sure to Save changes to apply the configuration.